Oculus Touch Controls
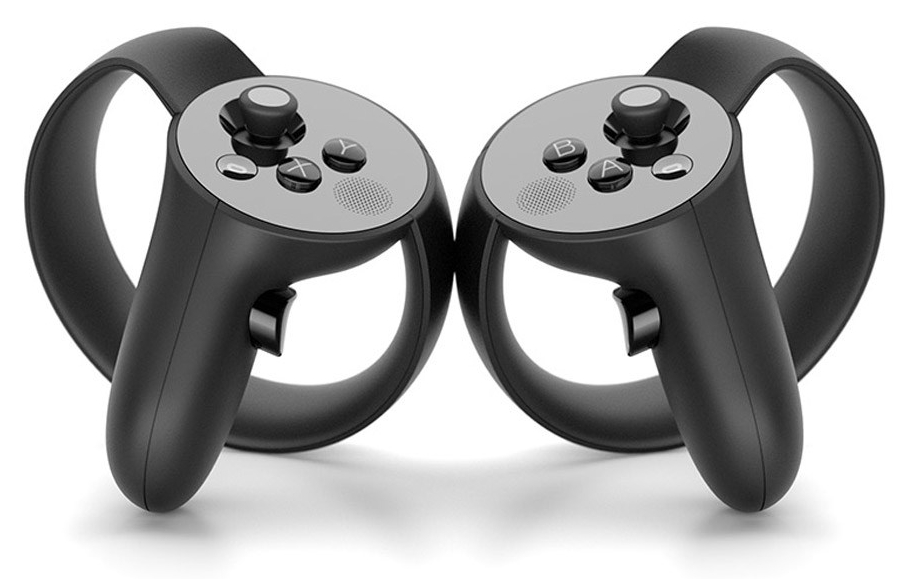
The Touch Controllers for Oculus Rift provide two separate motion-tracked 6 degree-of-freedom input devices, with button configurations almost identical to an XBox One controller - two triggers, two "shoulder" buttons, XYAB buttons, and left/and-right sticks. There are also two touch-sensitive pads, and a "menu" button, as well as a button that returns to Oculus Home. These are quite sophisticated controllers, which we take full advantage of in Simplex.

You can transparently switch between mouse, gamepad, and Touch controllers in Simplex. To activate Touch you just pick them up - as the tracking is activated, the touch controllers and cursors will appear in the 3D view. Although the mouse cursor will still be visible briefly, and will re-appear for a few seconds if you move the mouse, you currently cannot use Touch and mouse/gamepad simultaneously. You can also use a single Touch controller, although some of our control schemes require both.
In the VR environment, if you look down you will see two large cursors attached to your hands - Red for Right, and Green for Left. Aligned with each cursor will be a faint red laser-line, and in-scene there will be a cursor for each hand. The cursors are grey unless over an object, when they turn yellow (right) or orange (left).
All the basic UI in Simplex - buttons, menus, in-scene 3D gizmos, etc - can be activated with either hand. Like with the Gamepad, the two trigger buttons serve as the primary buttons that activate UI elements (think of these like left-mouse-button, but for each hand independently).
Grab Objects

The most intuitive thing to do in VR is to simply reach out and "grab" an object. In Simplex you do this by pointing at an object with one of the controllers and pressing Trigger+Shoulder. You can grab a separate object with each hand.
Note that the grabbing is done via the cursor-ray intersection, not the real-space hand position. It is very tedious to always have to get close enough to objects to touch them. However, since the tips of the hand cursors are actually offset forward from the controllers, if you do "grab" an object in real-space, the cursor will still hit it, and it will work as expected.
When you grab an object, and then move the controller, the object stays in a fixed relative position to the controller - like its on the end of a stick you are holding. This does mean that moving objects towards or away from you is limited by your reach. To move further, there is a shortcut - use up/down on the stick to shift the object away/towards you.
Drop Copies
In Simplex you can create objects quickly via drag-and-drop, and snap them together, but if you want to make many objects this is still time-consuming. So, there is a shortcut - press the A/X buttons while in a Grab to Drop a copy of the grabbed object at the current position.
Snapping
Positioning objects with direct manipulation is fast, but it isn't very precise. To help with that, you can quickly snap points on the source object to any objects that are currently selected, as well as any Pivot objects. This is similar to the Snap-Drag transform mode.
The image to the right shows an example. In the first image the user has Grabbed the cylinder. Next they use the other controller to select the cube, at which point the available snap targets appear in green. The possible cylinder snap targets are displayed in yellow. The user then moves the cylinder such that a pair of yellow and green spheres overlap, and the cylinder snaps to that position & orientation.
It is also possible to snap positions only, and not orientation, by changing the Frame Mode to World, using the toggle icons in the Cockpit. This is shown in the bottom-right image. When you do this, you can basically free-rotate the shape "around" the snap point, much like using a Pivot with the Transform gizmo.
Basic Interaction & Shortcuts
Much of the UI in Simplex is operated with click or click-drag actions, just like with the mouse in non-VR tools. However because we don't have shortcut keys to work with, many of the buttons on the Touch controllers have been overloaded with context-specific behaviours. You don't need to use most of these, but like keyboard shortcuts, you'll find that you are more efficient if you learn them.
Selection and Multi-Selection
Selection of objects is the same as with a mouse, except you can select with either hand. However Multi-object selection is complicated by the lack of a hotkey - this is not a common enough operation that we want to dedicate a button. So, to multi-select you must use both hands as follows:
- Select first object with a trigger press
- Press-and-hold trigger on that object
- Select additional objects using trigger-presses on other hand
- Release held trigger on first hand
Activating the Cockpit UI buttons and widgets can be done with either hand, and which hand doesn't matter except for Tool selection (see below). Similarly 3D gizmos in the scene, like the transform gizmo or primitive edit gizmos, can be done with either hand. Currently no UI elements take advantage of multiple hands.

Undo/Redo
There are visual Undo/Redo buttons at the bottom-center of the cockpit. However since Undo/Redo are such frequent operations, on the Touch controllers we have assigned the Y/B buttons for Undo (left hand) and Redo (right hand).

Clear Tool/Selection
When a Tool is active on one hand or the other, it can be cleared by selecting the Clear icon in the Tool Panel. As a shortcut, you can also "click" the relevant joystick to clear the Tool for that hand. If no Tool is active, then clicking the joystick will clear the current Selection in the Scene.

Cycle Panels
You can switch between the Primitive, Tool, and Material panels (on the left side of the Cockpit) using the tabs above the panel. As a shortcut, you can also use the left joystick, when not using the controller for something else.
Primitive Drag-and-Drop
One of the ways to add objects from the scene from the Primitives panel is to "drag" it from the panel into the scene. During this interaction, there is a shortcut with the Touch controls - you can use the up/down stick axis of the respective hand to scale the primitive. This scaling is persistent, so you can drop multiple objects of the same size.
View controls
In a traditional 3D CAD tool, viewing controls can account for 25-50% of user interactions. This is why viewing controls are given dedicated mouse buttons and/or easily-accessible hotkeys. In VR we don't have hotkeys, so we largely dedicate the Shoulder buttons to viewing controls.
One thing to keep in mind while doing View changes is the Target point. If you are finding that scene is moving in ways you don't expect, use the A/X popup to re-center the Target point (see below). You really can't do this enough!
Grab Scene

Like grabbing objects, it just "feels right" to be able to "grab" the scene and move it around with your hands. In Simplex you can activate View Grab mode by pressing down both Shoulder Buttons together. You can then perform zooms, pans, and rotates by moving your hands as follows
Zoom: move hands apart to zoom in, together to zoom out (like pinch-to-zoom on a touch device)
Pan: move hands together, in any direction. This is a 3D pan, meaning you can also shift the scene forwards/backwards by moving your hands in/out. So you can "pull" the scene towards you.
Orbit: To spin the scene around its up-axis, move your hands like you are spinning a horizontal steering wheel. To tilt the scene up/down, tilt both hands up/down simultaneously.
Note that you can only do one of these view changes at a time. When you first activate Scene Grab, you will be in a "dead zone" and nothing will happen with small hand movements. Once Simplex has determined which of these actions you are performing, the scene will begin to move. You will have to release and press the buttons to switch modes.
Why not allow all three at once? We tried, and it is really hard to control! Maybe once we have a settings dialog...
Change Scene Relative Size (Workbench Mode)

By default, the standard location of the scene in Simplex is set back at a distance, so you can see everything. However because we are working in "real" 3D space, if an object is a reasonable size at a distance, then when you get up close it is likely to be enormous. This is neat, but not very practical for editing, so Simplex allows you to quickly change the relative size and position of the entire scene.
To perform this operation, you again use Left+Right Shoulder, but here the in-scene cursors matter. The cursors should be at the same 3D location, ie basically overlapping. You can tell you have done it right because a grey transparent sphere will appear. As you move the cursors apart, there sphere will grow and turn yellow. When you release the buttons, the scene will be re-sized so that the region within the sphere is roughly 1 meter across, centered 1 meter in front of you.
The intention here is that it should feel like you put the selected area on a table in front of you. It will be close enough that you can use direct hand positions easily, and you can still use the view controls to move around.
To return the scene to the standard size/position, use the Reset button in the cockpit.

Orbit / Zoom
The Grab Scene control is probably the one you will use most, however in some cases a more controlled change is helpful. To do a more traditional Orbit, use Left Shoulder + Left Stick. While you have the left shoulder button held down, you can also use the Right Stick to zoom in/out.

Pan / Zoom
Not much to say here, use Right Shoulder + Left Stick to do a standard 2D view pan motion, and again use the Right Stick to zoom in/out while holding the shoulder button down.
Fly Controls
(coming soon...)

Center & Teleport
When you aren't doing anything else, the X and A buttons will bring up the radial menu. From here you can use Center to position the target point at the click location, and re-center the view. You can also access the various Teleport options, as described elsewhere.
Tools

In Simplex, Tools allow you to create and edit objects in the scene. You activate a Tool by clicking on its icon in the Tool Panel. Note that when a Tool is active, many other operations cannot be performed, and you will need to exit the tool (by clicking the Cancel button in the Tool Panel).
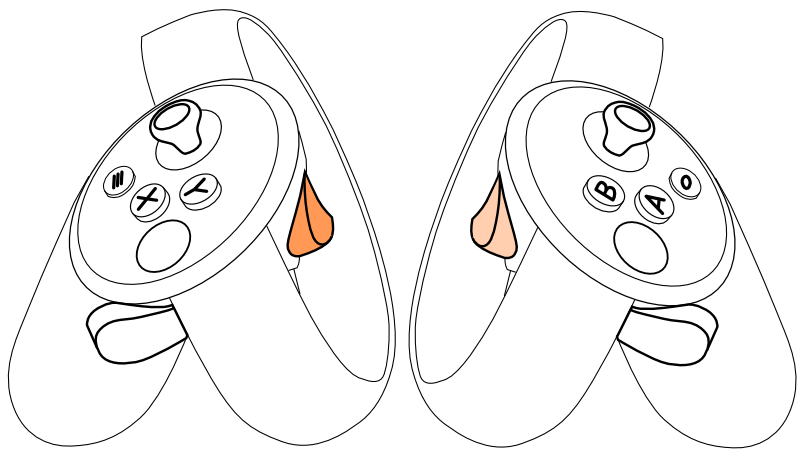
With the Touch controllers, a separate Tool can be active on each hand. The Tool active on the Right hand will have a Red star in the panel, and the Left-hand tool will have a Green star. In addition, the icon for the active Tool will appear on the respective Hand Cursor (see images to right).
Several tools have shortcuts that take advantage of the Touch controllers, as follows:

Draw Tube Tool
In Touch mode, the Draw Tube tool uses the 3D position of the controllers to allow full three-space drawing. In addition, you can use the up/down axis of the relevant joystick to change the tube radius.
Normally the Draw Tube tool draws from a starting ray-intersection point, unless there isn't one, then it draws in free space (ie at the tip of the hand cursor). If you would like to force drawing from the hand cursor, rest your finger on the relevant joystick (which is a touch-sensitive surface!)

Screencap
There is no Print Screen button in VR, so sharing a screengrab is actually a bit of a problem. Currently in Simplex we have made the Menu button on the left controller a dedicated Screen Capture button. Note that currently this captures the desktop screen, not the VR view, and so it will take a bit of practice to get a sense of what is actually captured (in particular the vertical height will be much less than you see in VR).
By default the images are stored in your Dropbox Screenshots folder, ie C:\<User>\Dropbox\Screenshots\. If this folder doesn't exist, they will be written to the root C:\ drive. This path will be configurable in future versions.