Simplex Controls & Interface
When you open Simplex and click through startup screen, you will be presented with a blue ground plane and some floating 3D interface elements that are just out of view. Because the VR view is quite constrained, these UI elements are meant to stay out of your line of sight until you need them. To use this UI you will have to just glance slightly left, right, or down. We don't put any UI above eye level because it will be in the way when you are making tall buildings, and glancing up is uncomfortable. This layer of UI elements, which we call the Cockpit, is about half a meter (~2 feet) away from your head, much closer than the scene. The image below-right shows the current modeling Cockpit layout in Simplex. The Cockpit UI is (approximately) laid out on a sphere that is centered at your head.


Cursor Positioning and Movement
Today, when you use Simplex you'll be using a Mouse or Gamepad. These two devices share a cursor, which will appear as 3D version of the standard 2D cursor. Because we're in VR, the cursor lives in the 3D scene, but since the Mouse is a 2D input device, the cursor movement is still in a 2D plane, but this plane is attached to your head. So, when you look around, the cursor will "stick" to your view, and hence you can use look-pointing like in other VR apps if you wish. But you can also move the cursor with the mouse or left stick on the gamepad.
This might feel a bit odd at first, but you'll find that it is actually very fluid, once you get used to it. We think it is actually faster than regular 2D mouse-only input, because you can get the cursor close to your target very quickly by looking. This is a big help with the gamepad, which is less accurate than the mouse.
Standard Buttons
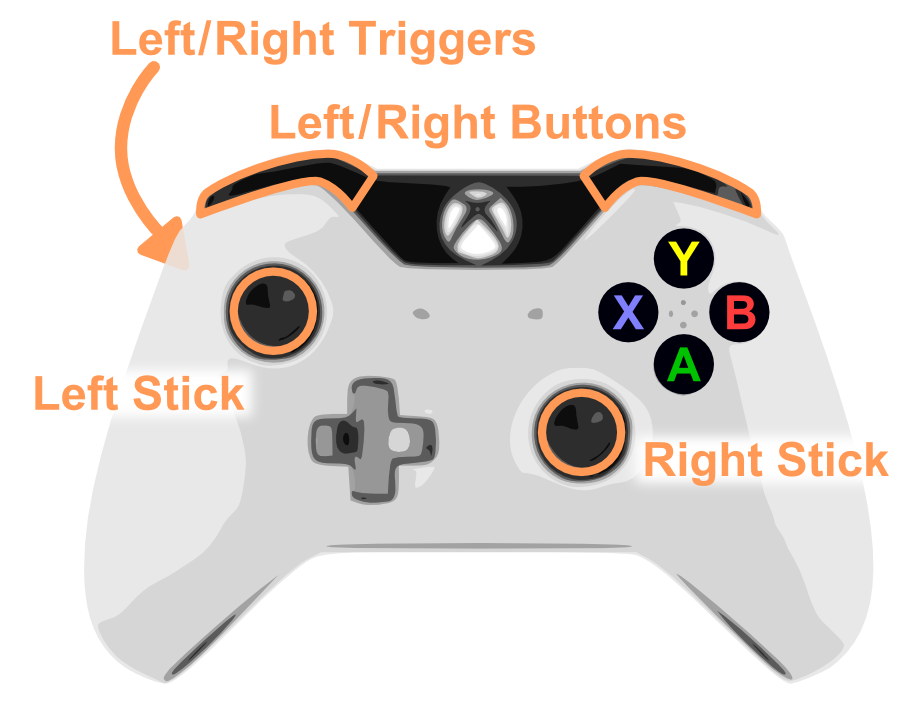
In 2D interfaces the UI is relatively standardized. We have the left mouse button as the primary click/action button, and the right mouse button does secondary things like bring up a popup menu. But we also have a keyboard, and we often use modifier keys like shift/alt/ctrl.
With a Gamepad we don't expect that you will also be using a keyboard, so the controls are more complex. The gamepad has left and right Triggers as well as left and right Shoulder Buttons, then left and right Sticks, and finally four other buttons - A,B,X,Y. We're going to be using all of these in some places. However the the most important things to know are that:
- Left Stick moves the cursor
- Left Trigger and the A Button are both equivalent to Left Mouse button
- Right Trigger is equivalent to the Right Mouse button
Cockpit Tracking & Positioning
The Cockpit will translate with your head movements, but it can't rotate with your head all the time (or you'd never be able to glance at the widgets!). So, we have a "smart" tracking system - if you look left or right long enough, the cockpit will rotate around the up axis to track your head movements, and if you stay still for a second or two, it will lock back into place. It always stays level, though. The little capsule at the center of the Cockpit indicates the tracking state - green for stable and orange for tracking. You can double-click on the capsule to toggle auto-tracking on and off (red means off). You can also left-click-drag on the capsule to reposition the cockpit relative to your head.

Undo/Redo and Menu Bar
The Undo and Redo buttons are two blue arrows, in the middle of the Cockpit. These are shown in the images directly above, in the Cockpit Tracking section. There is also a set of buttons in the lower-right region of the Cockpit, which are used to perform various actions:
Import - load external mesh files into the scene. Currently only .OBJ meshes are supported, with or without texture maps. Right now these meshes are loaded as single objects into the scene, the parts of the mesh cannot be manipulated independently. See details on the file browser below.
Export - write an .OBJ file for the current scene. Unfortunately writing out the texture-map information is currently not supported.
Load - read a saved Simplex scene file.
Save - write out the current scene to a Simplex scene file. Note that currently imported Meshes are only stored as reference paths. When you load a scene file back in, the mesh file is loaded from its original location (or path relative to the scene file at time of saving, if the absolute path is no longer valid).
New - Discard all objects in the current scene, ie create a new empty scene
Quit - exit Simplex

Scene Construction
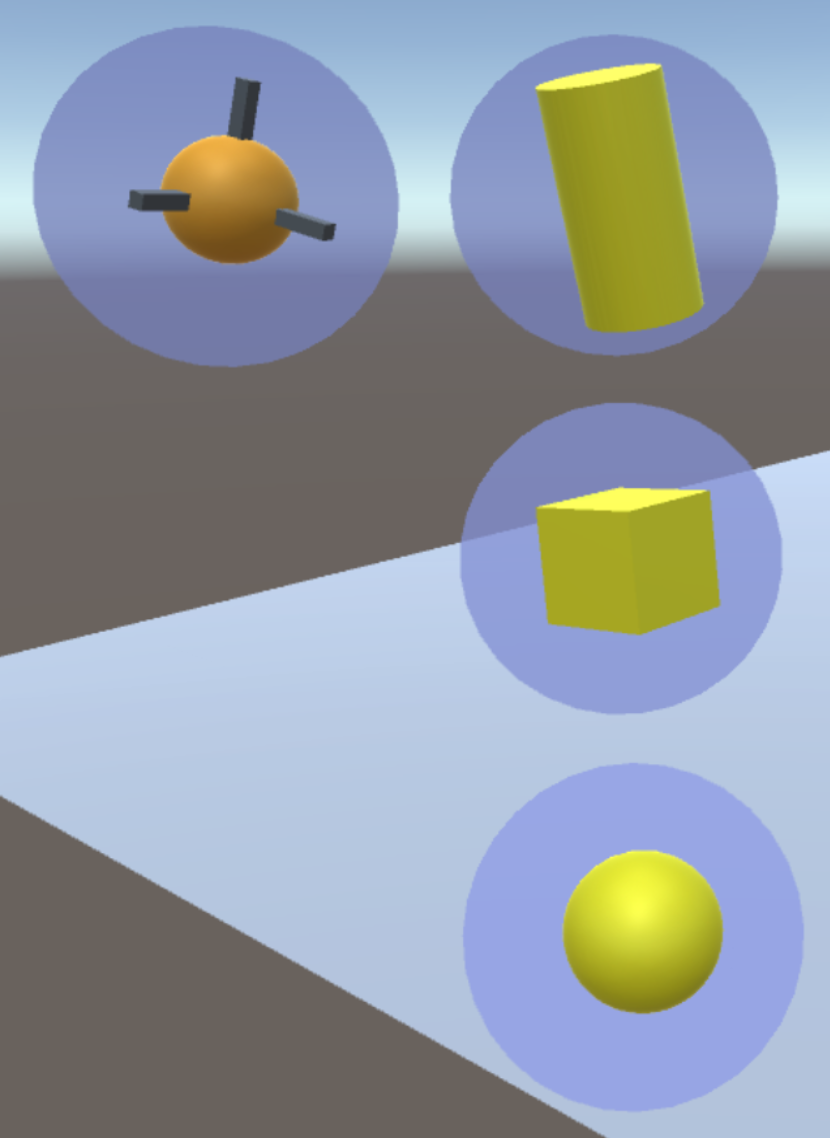
When you glance left at the Cockpit, you'll see a set of discs with 3D shapes floating in front of them. These buttons will add objects to the scene. Current you can add Primitives like Spheres or Cubes, and also Pivot objects, which are orange spheres with sticks coming out of them. You can see this panel in the image on the right.
If you left click with the mouse/gamepad on one of these icons, the associated primitive will be added to the scene. It will be placed at the origin and set to a default size. Note that if there was already an object at the origin, the primitive may appear inside it.

You can also left-press-drag-release on these icons to place a primitive an an arbitrary location in the scene. As you move the cursor, a ray-intersection with the scene objects and ground plane is computed and the primitive is positioned at the intersection point. If the hit point lies on an object, the primitive will be aligned with the surface normal at the hit location.
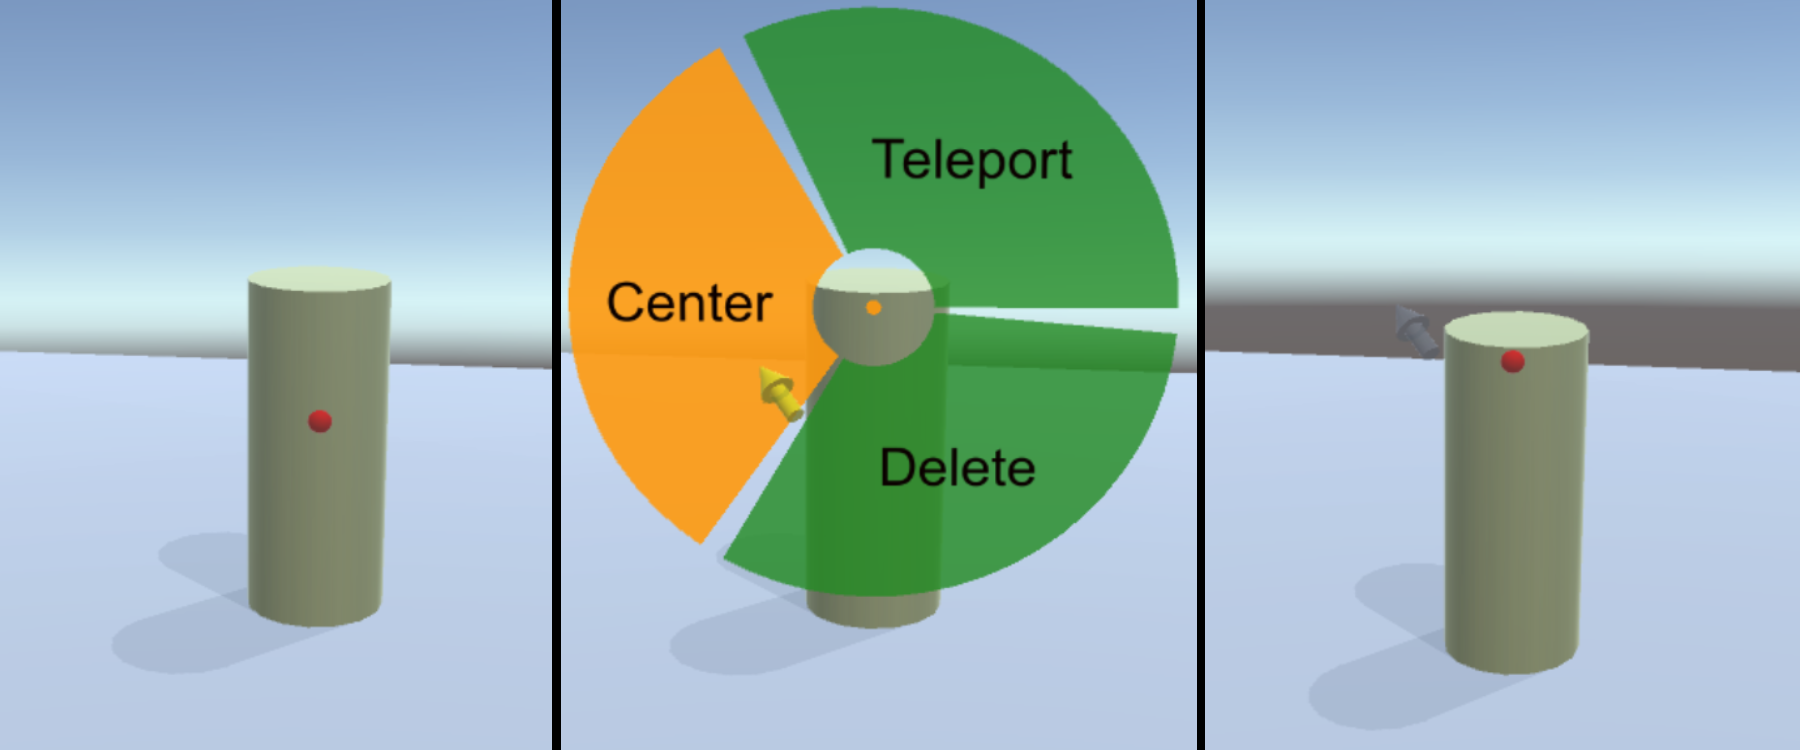
To delete an object, place the cursor over the object you want to delete, and then use the right mouse button or right trigger to summon the radial popup menu, and select the Delete option.
Viewpoint Manipulation
Positioning the camera is one of the most common tasks in traditional CAD tools. However in VR we can't move the camera because it is stuck to your head! So we actually move the scene instead. You shouldn't notice most of the time, but occasionally there are differences in behavior from tools you might be used to.
When you are looking at the 3D scene, there are three basic view manipulation controls you can do:
Orbit rotates the scene left/right and up/down (but does not "twist" it!)
Pan translates (slides) the scene left/right/up/down
Zoom brings the scene closer to your eye
With the mouse, these tools are usually on hotkey modifiers, and Simplex is no different. Currently we support Maya hotkeys - you hold down the alt key and then left mouse orbits, middle mouse pans, and right mouse zooms.
With the gamepad, we don't have hotkeys, but we do have two joysticks. We use the shoulder buttons to toggle to the view controls. When you hold the left shoulder button, then the left stick orbits, and the right stick pans. When you hold the right shoulder button, then the left stick zooms and the right stick pans. So, you actually have more control when navigating the scene using the gamepad than you do with the mouse.
View Target Point
We mentioned above that Orbit rotates the scene, but rotates around what point? Always rotating around the origin doesn't make sense once you have panned around the model. Similarly Zoom toward what point? In 3D tools there is always a View Target point somewhere in 3D space. This is sometimes called the pivot point. Often this point is not explicitly shown, but it moves around with the camera and you can tell where it is based on how the camera moves.
In Simplex we show the Target point whenever you are currently in a view manipulation model, for example when holding the alt key or the gamepad shoulder buttons. The Target is rendered as a small red sphere, seen below-left. This serves two purposes - it tells you where the Target is, and what mode you are in.
Note: a current bug in Simplex is that sometimes you may get stuck in the view control mode, particularly if you switch apps by alt-tabbing. In this case the red ball will not disappear. If that happens, try hitting alt on the keyboard several times, or tapping the shoulder buttons. If the red ball disappears, you should be fixed.
The View Target is fixed when you Orbit and Zoom, but is translated when you Pan. You can also explicitly position the View Target at a 3D location using the Center option in the popup radial menu. You bring this menu up by right-click or right-trigger on an object in the scene, or the ground plane. When you select Center, the Target will be positioned where the orange dot is located, and the scene will animated-pan so that the Target point lies at the center of your view.
Egocentric View Controls
The Orbit/Pan/Zoom model works well when you are outside an object, as if it were something you are holding in your hand. You rotate the object, not your head, to get a look at the other side. However, if you are inside a building, you don't look to the left by rotating the building - you rotate your head.

"Outside" or Exocentric view controls are the standard in CAD tools. However the whole point of VR is to be able to get up close to things, like you are standing next to them. In this case you will want to switch to "Inside" or Egocentric controls. You can do this with the Viewing Control toggle buttons in the Cockpit, which you'll see if you glance down and to the right. The exo button is for when you are looking at an object from the outside, and the ego button is for when you are navigating through a scene.
The controls in ego mode are similar to what you would find in a first-person video game. So, you don't Orbit, you Fly or Walk. This means that up/down (on the mouse) moves you forward and backwards, and the left/right with turn left/right. Pan is similar, you will change your height with up/down and slide or strafe left/right. Finally in ego mode you don't really Zoom, so the Zoom control isn't strictly necessary. Currently it acts as a forward/back Walk but a left/right strafe.
The ego controls are also a little different from the exo controls because they are rate-controlled. This means that instead of "clawing" to specify movement, the movement direction and speed is determined by how far you move the cursor relative to the starting click point. In a small radius around the click point there is a "dead zone" where you will not move. As you move the mouse further from the click point (try this by slowly moving the mouse), you will begin to move at a slow speed and then ramp up to a maximum speed.
We are using rate-controlled input for the first-person-style controls because we think these will help you control motion sickness. VR video games are carefully designed to avoid too much first-person movement, as this can easly make the player sick. However that doesn't make sense for a design tool, where sometimes you are just going to need to go where you need to go!
Note that you may still want to use exo if you are inside a scene, to tumble around a specific object. Just make sure you set the Target point first with the Center command, as described above. And if you get completely lost, you can always hit the Reset button and the view will go back to outside the object
Teleporting
There are two problems in VR with using the explicit view controls described above to move around the 3D scene. First, you'll find that in VR you will want to get closer to things than you do in a normal 3D tool, and all that back-and-forth can be tedious. Second, too much crazy view manipulation can make you nauseous, particularly when you are moving around inside virtual spaces.
A safer and faster alternative is to Teleport. When you teleport, you select a new location, the screen fades to black, and when it comes back you are in the new spot. This is well-known to mitigate motion sickness. However, in a video game the Teleport locations are usually placed by the game makers. In a 3D design tool you need to be able to teleport anywhere! So, we have included multiple Teleport types.
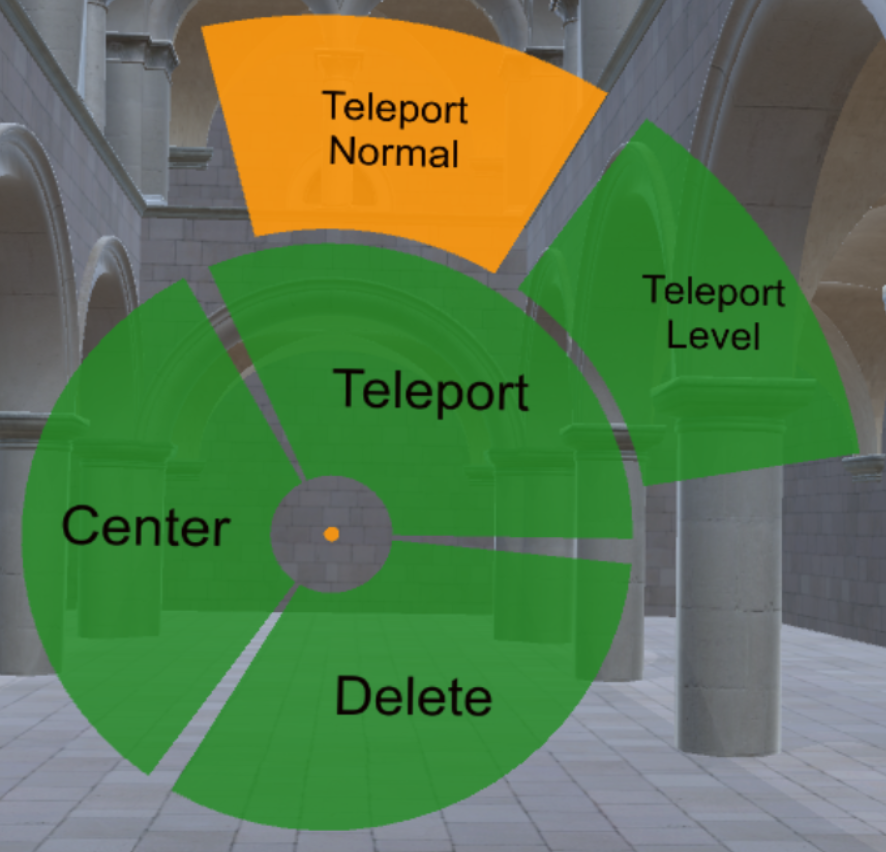
You access the Teleport options from the popup radial menu, either with right-click or right-trigger. There are a few options:
Teleport - this is the simplest option. We cast a ray to the cursor location (since you have to move the cursor to select from the menu, the ray is cast at the orange dot). When the view comes back you will be looking at this point from the same angle as when you started, set back a fixed distance (currently 1 unit). The Target point will be set to this hit location.
Teleport Level - same as Teleport except that the view is rotated so that the scene is parallel to the ground plane. So you'll be floating next to the Target point, looking at the side of the Target sphere.
Teleport Normal - This is an extension to Teleport Level that tries to be clever. If you use this Teleport with a vertical surface, like the side of a vertical column, you will be positioned such that you are set back along the normal from the hit point, and looking down that normal. So, basically it is a kind of "look directly at" option, vs the standard Teleport Level, which doesn't have this behavior. However in addition, if you use Teleport Normal on a near-horizontal plane (like a ground plane), instead if looking directly down at the ground, you will be placed standing on that plane, with your feet at the click point. So you can think of this option as both "Look There" and "Stand Here", depending on where you click.
Teleport Here - this option only appears when you bring up the menu over a Pivot object. Your eye will be placed exactly at the Pivot location. As a result, Pivots can be used to "save" viewpoints, for example if you want to set up a scene where you can quickly jump to specific locations.
Object Selection
Simplex has the standard concept of "selected objects", just like most other 3D tools. Selection lets the system know you want to do something more involved with that object(s). For example, the various object transformation controls will automatically appear when an object is selected.
To select with the mouse, simply left-click on the object. To change selection left-click on another object, and to clear the active selection, left-click on the background. You can also multi-select with shift+left-click.
With the gamepad, you similarly select and de-select with the left-trigger. Since we don't have hotkeys, we use the A button as a multi-select modifier. Hold down A while left-trigger-clicking to add or remove objects from the selection set.
Moving Things Around
When you select an object in Simplex, we add one or more 3D widgets to the scene which you can interact with to manipulate the object. We call this collection of widgets a Gizmo. For example the default Transform Gizmo is shown to the right, and it is composed of 10 widgets. Click-dragging on each widget applies a different constrained 3D transformation to the object.

Currently there are three Gizmos available - Transform, Snap-Drag, and Edit Primitive. You can change the active Gizmo type using the toggle-button set in the Cockpit, which you'll see if you glance down and to the left. Below these buttons are a pair of toggle buttons for the Frame Type, which can be either World or Local. We'll explain these in more detailed below.
Transform Gizmo

The Transform Gizmo is just like the 3-axis manipulators you might be familiar with from other 3D tools. Each component of the Gizmo applies a transform to the object. The three Translation Axis widgets allow you to translate the object along those axis. The three Rotation Arc widgets allow you to rotate around the axis perpendicular to the arc (ie around the translation axis with the same color). The three triangle-shaped Translation Plane widgets allow you to apply a constrained translation in the respective plane. And finally the Uniform Scale widget at the center allows you to change the size of the object.
By default the Transform Gizmo axes are aligned with the Local coordinate system of the object. So, for example, with a Cylinder primitive, the Y axis (colored Green, because RGB green is (0,1,0), which is also the positive Y axis) points along the length of the cylinder. When the Frame Type is set to World, however, the Gizmo will instead be aligned to the axes of the underlying Scene coordinate system. When multiple objects are selected, the World frame axes are always used.
Transforming Around a Pivot
click to enlarge
By default the Transform Gizmo is placed at the origin/center of the selected object, or if multiple objects are selected, at the average position of the selected object centers. However you can also use any Pivot object as the transformation frame. Simply right-click or right-trigger on the desired Pivot while the the Transform Gizmo is active, and select Use Frame in the radial popup.
The transformation frame will then shift to the position and axes inherited from the Pivot (see image to the right, in below-left quadrant). Now transformations are applied to the selected objects relative to the active Pivot.
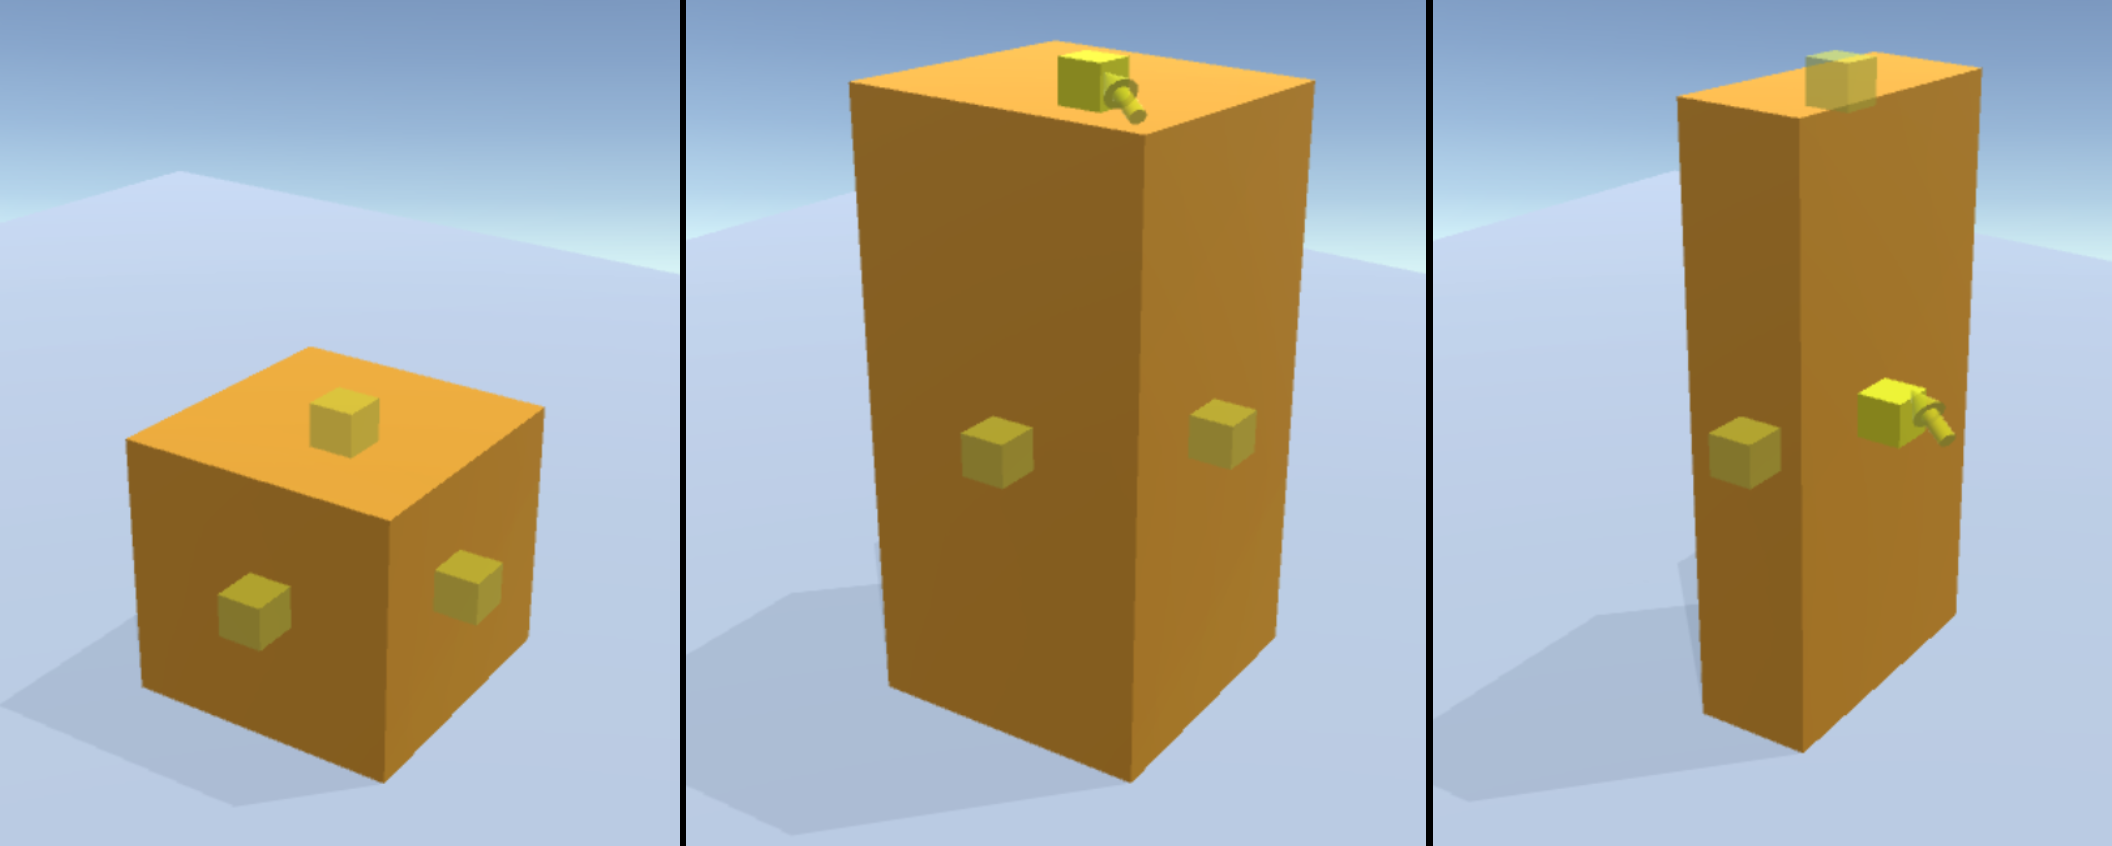
Snap-Drag Gizmo
The Transform Gizmo is useful for careful, precise transformations. However if you want to quickly assemble an object, they are quite tedious, and require some expertise. A more efficient alternative is the Snap-Drag Gizmo. With this tool active, when you select an object a set of automatically-generated Pivot-like objects will appear. You can "snap" these pivots to other Pivot objects in the scene by left-click/left-trigger-drag. When you perform this interaction, the selected object will transformed so that the pivots are coincident and then the primitive will be re-oriented so it is aligned with the target Pivot frame, as shown in the images below.
You can adjust the behavior of Snap-Dragging using the Frame Type toggle. If you set the frame type to World, then the snapping will only be translational, the selected object will not be rotated.

Edit Primitive Gizmo
The third available Gizmo is the Edit Primitive Gizmo, which you can use to modify parameters of the parametric primitives like Cylinders and Boxes. Currently we only support a few parameters for each primitive, controlling linear dimensions like Radius and Height. When you select an object a set of boxes will appear, each of these is a handle you can click-and-drag on. An example is shown below.
Simplex File Browser
(details coming soon...but you should be able to figure this one out!)
