Modeling Mode Extension Plugins in UE5
/
In Unreal Engine 5.0, Modeling Mode includes a large set of Tools, built using the Interactive Tools Framework, which allow users to create and edit meshes in the Level Viewport. However, something else that came with UE5.0 is the ability for third-party plugins to add additional Tools into Modeling Mode. In this tutorial I will explain how that works, and provide sample code that adds a small set of custom Tools.
I will not go deeply into the mechanics of implementing new Interactive Tools in this article. I have discussed this quite a bit in some previous posts, such as The Interactive Tools Framework and Interactive Mesh Processing with libigl. At time of writing, those Tutorials have not been updated for UE5, and some changes to the Interactive Tools Framework (ITF) APIs may have broken that older Tool code (updates to those posts are in progress and I will update this article when they are done). But the high-level concepts/etc are still applicable, and I have included a few basic UE5.0-style Tools with this article’s sample code.
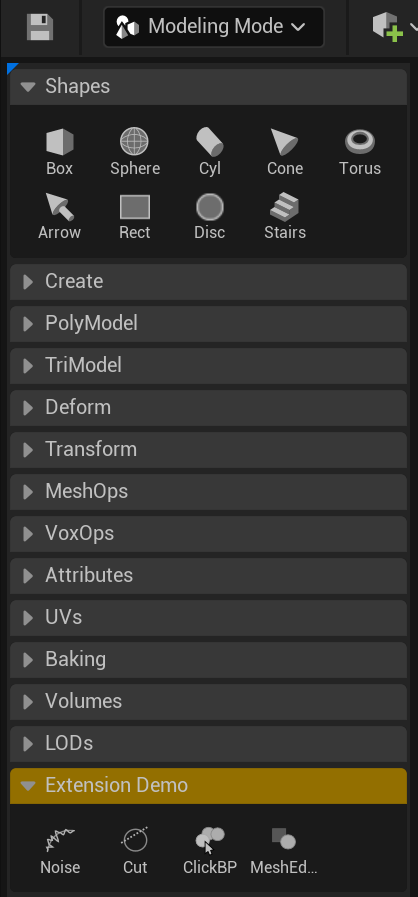
The Tools will appear in their own section of the Modeling Mode tool palette, as shown in the image to the right - I called the extension “Extension Demo”, and there are 4 Tools - Noise, Cut, ClickBP, and MeshEdBP. Note that I set the color of this section using the Modeling Mode palette customization features, which I demonstrated in this YouTube Video. The Palette customization is completely separate from the Extension mechanism, but is fully functional with Extensions (so, for example, I could add an Extension Tool to my Favorites section).
(Mandatory Disclaimer: your author, Ryan Schmidt, is an employee of Epic Games. However, gradientspace.com is his personal website and this article represents his personal thoughts and opinions. This document and sample code are not supported by Epic Games!)
IModularFeature and the IModelingModeToolExtension API
Modular Features are a mechanism for core Unreal Engine and Editor code to support features and capabilities defined in plugins. Essentially, the way it works is that UE publishes standard interfaces, and then plugins can implement that interface and register themselves as a provider of an implementation. Various standard Editor/Engine features are implemented this way, but it also allows for third-party developers to provide their own implementation(s).
The core of the system is the IModularFeature interface, which doesn’t actually contain any functions, it’s just the magic base-class that makes the system work. If you search the codebase for “public IModularFeature” you will find many subclasses of this base class, all of these are different Modular Feature APIs that the engine supports in some way (I found 96 in UE5.0). In our case, we will be using IModelingModeToolExtension, which is defined in Engine\Plugins\Editor\ModelingToolsEditorMode\Source\ModelingToolsEditorMode\Public\ModelingModeToolExtensions.h. This is an API that Modeling Editor Mode uses to interact with the available Tool Extensions. Essentially, Modeling Mode will ask each registered extension “What Tools do you have for me?” and then it will add sections and buttons to the Modeling Mode Tool Palette to expose those Tools to the user. It is really that simple.
The IModelingModeToolExtension API has 3 functions, listed below (minus some boilerplate)
class IModelingModeToolExtension
{
  virtual FText GetExtensionName();
  virtual FText GetToolSectionName();
  virtual void GetExtensionTools(const FExtensionToolQueryInfo& QueryInfo, TArray<FExtensionToolDescription>& ToolsOut)
};
GetExtensionName() returns an identifier string that needs to be unique for your Extension. GetToolSectionName() returns the string that will be used in the Tool Palette. And GetExtensionTools() returns a list of FExtensionToolDescription objects, one per Tool, that Modeling Mode will use to create the Tool Palette button and launch the Tool on-click. This struct is shown below, again basically we have an identifier name, Command info for the Button (which includes the Icon), and then the ToolBuilder that Modeling Mode will use to create an instance of the Tool.
struct FExtensionToolDescription
{
	FText ToolName;                         // long name of the Tool
	TSharedPtr<FUICommandInfo> ToolCommand; // Command that is launched by the Palette
	UInteractiveToolBuilder* ToolBuilder;   // Tool Builder that will be called to create the Tool
};
The FExtensionToolQueryInfo struct passed to GetExtensionTools() by the Mode is for optional/advanced usage, we will skip it for now, and I’ll cover it below in the Extra Bits section.
So, basically, the way you use IModelingModeToolExtension is as follows:
Write some UInteractiveTool implementations, these are your Tools
Create a new Plugin, and subclass/implement IModelingModeToolExtension. Normally this is done in the same class as the IModuleInterface implementation, ie the class that contains the StartupModule()/ShutdownModule() functions (Note that your Tools do not have to be in this plugin/module, but they can be)
In the GetExtensionTools() function, return a list of your available Tools with a ToolBuilder for each
In the StartupModule() function, call IModularFeatures::Get().RegisterModularFeature(IModelingModeToolExtension::GetModularFeatureName(), this); (and similarly UnregisterModularFeature in ShutdownModule)
Step 4 is the critical one, basically this is how your Plugin/Module tells the Modular Feature system “Hey I implement this named Interface!”, where the name is provided by IModelingModeToolExtension::GetModularFeatureName(). Modeling Mode will (later) ask the Modular Feature system “Hey does anyone implement this named interface?”, and the Modular Feature system will say “Yes! This thing does!” and provide your implementation.
From the Point of View of the Extension Writer, this is all there is to it. There is a bunch of boilerplate in setting up the TCommands and Style objects for your plugin, which you can copy-paste from my sample, but the actual Modeling Mode Extension part only takes these few steps listed above.
The UE5ToolPluginDemo Sample Project
You can grab the UE5ModelingModeExtensionDemo project from the Gradientspace Github at https://github.com/gradientspace/UE5ModelingModeExtensionDemo. I have included the entire project, however this is just a generated standard UE5 Blank project template. All the relevant code for the sample is in \Plugins\SampleModelingModeExtension, which you can easily copy-paste to any other Project, as it has no dependencies on, or references to, the base Project.
There are 3 boilerplate/setup classes in the SampleModelingModeExtension plugin, lets briefly go through them:
FSampleModelingModeExtensionModule
This class is the main class for the Module, which implements IModuleInterface (ie StartupModule() / ShutdownModule() ) and our IModelingModeToolExtension Modular Feature API, discussed above. The cpp contains the bare minimum lines to register the Style, Commands, and Modular Feature, and provide the list of Tool description structs.
FSampleModelingModeExtensionStyle
The Style class is used to provide icons for the Tool Palette. If you had (for example) registered details customizations for property sets of the Tools, you might put additional things in this Style, but otherwise, it’s 100% copy-pastable boilerplate except the lines that look like this:
StyleSet->Set("SampleModelingModeExtensionCommands.BeginMeshNoiseTool", new IMAGE_BRUSH_SVG("Icons/NoiseTool", DefaultIconSize));
Note that the strings here are important. The SampleModelingModeExtensionCommands string is not the class name, but rather the string passed to the TCommands constructor in the FSampleModelingModeExtensionCommands class. I just tend to use the same string everywhere. The BeginMeshNoiseTool string is the name of the FUICommandInfo member variable of the FSampleModelingModeExtensionCommands, passed to the UI_COMMAND macro, and not (eg) the name of the Tool Icon or identifier string.
FSampleModelingModeExtensionCommands
This class is a subclass of TCommands, which uses the Curiously Recurring Template Pattern (CRTP - Wikipedia). Basically we just use this to provide UI Command objects that can be assigned to Tool Palette buttons. The UI Command system will provide the icon (via the Style), and the FExtensionToolDescription struct will let Modeling Mode link up the Command to the ToolBuilder you specify. So, again, this is really just lines of boilerplate that look like the following
UI_COMMAND(BeginMeshNoiseTool, "Noise", "Add Noise to selected Mesh", EUserInterfaceActionType::ToggleButton, FInputChord());
Where you will have one line for each Tool your plugin provides.
The Sample Tools
I have included 4 basic Tools in the sample project. UMeshNoiseTool is a basic tessellate-and-displace Tool, and UMeshPlaneCutTool shows how to create a 3D gizmo inside a Tool, and then use it to do a plane cut of the active mesh. In both cases the Tool subclasses the UBaseMeshProcessingTool base tool. This base tool provides very useful functionality for editing single meshes - in particular, it automatically computes the mesh operation asynchronously in a background thread, with support for cancelling. This is done via a FDynamicMeshOperator, you will find the simple Noise and PlaneCut operators in the .cpp files.
The Noise and PlaneCut tools are basic versions of the Displace and PlaneCut Tools in Modeling Mode. Many Tools in Modeling Mode are also derived from UBaseMeshProcessingTool (although for example the Modeling Mode Plane Cut Tool support operating on multiple objects, which adds a lot of complexity). However the other two Tools in this sample are unique in that they use a Blueprint to define their behavior (!)
UActorClickedBPTool
Users of modeling tools each have their own unique workflows, and this often results in feature requests for Tools that are extremely specific to a particular task or workflow. However, adding a new Tool tends to increase the cognitive load for all users, and at some point, a Tool is just “too niche” to add to the UI by default. In UE5.0, I added Geometry Script to allow end-users to create their own Tools in UE Blueprints. If you aren’t familiar with Geometry Script, I suggest you check out this playlist of short videos I have posted on YouTube. Using Geometry Script and Editor Utility Widgets, it is possible to make something that is similar to a Modeling Mode Tool, like I did in this video where I made a “convex hull wrapper” mesh generation Tool. However, this approach is a bit clunky compared to a Tool integrated into Modeling Mode.
So, UActorClickedBPTool is a Modeling Mode Tool that doesn’t have any built in behavior, and instead just executes an arbitrary function - defined in a Blueprint - on whatever Actor is clicked while using the Tool. You provide the BP function by subclassing the UActorClickedBPToolOperation object type, which has a function OnApplyActionToActor that can be overridden in the BP. When configured in the Tool, this function will be called on Actor click.
As a simple example, I implemented a BP Operation that flips the Normals of clicked StaticMeshActors. You will find the BP_FlipNormals blueprint operation in the /ActorClickBP Content folder. The entire Blueprint is shown below (click to enlarge the image). The gif above-right is a brief demo of using the Tool, assigning the FlipNormals BP, and then clicking on two meshes in the level a few times.
UMeshProcessingBPTool
After my success with the ActorClickedBPTool, I decided to try to make a variant of UBaseMeshProcessingTool where the mesh processing operation could be implemented in BP using Geometry Script. This is in theory no more complex than UActorClickedBPTool, however to avoid writing a lot of boilerplate code, I decided to directly subclass UBaseMeshProcessingTool, and just wrap the BP execution in a FDynamicMeshOperator like in the Noise and Plane Cut Tools. This basically works, and UMeshProcessingBPTool has the same structure as the ActorClickedBPTool, but in this case UMeshProcessingBPToolOperation is the base UObject class for the mesh processing operation, and BP subclasses implement the OnRecomputeMesh function which takes a UDynamicMesh as input/output.
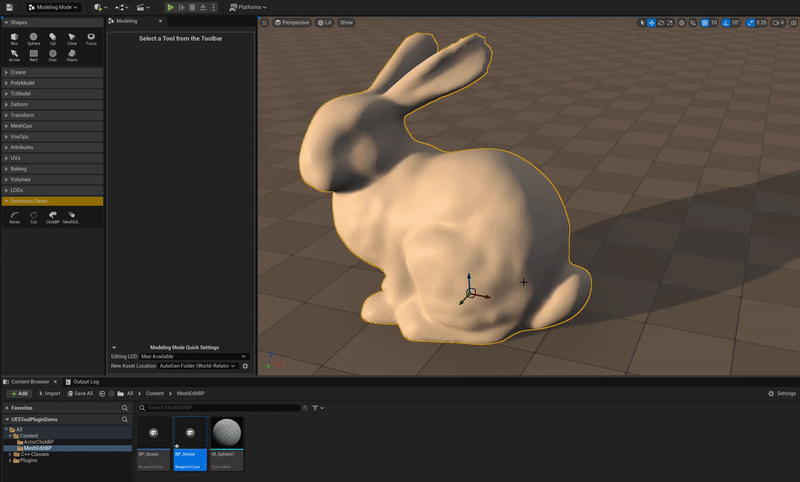
I have included two MeshProcessingBPToolOperation examples in the /MeshEditBP content subfolder. BP_Noise is shown in the video below, it implements a simple PN-Tessellation and Perlin-Noise displacement operation. This is basically the exact same Geometry Script setup as I have demonstrated in other videos, just running in the context of an Interactive Tool. BP_Boxes is a simple blueprint that appends random cubes to the input mesh, not particularly useful, I just wanted a second example.
Now, there is a subtle complication with this setup. You may recall that earlier I mentioned that UBaseMeshProcessingTool automatically evaluates it’s FDynamicMeshOperators in background threads. However, it is generally not safe to access UObjects in background threads, and so (in general) Blueprints also cannot be executed asynchronously. A conundrum! To work around this, in the MeshProcessingBPTool I have added a bit of a hack, where by default the Operator will (via a helper class) force the BP execution to occur on the Game thread (generally making the background thread computation useless)
However, I have found that in fact it is not catastrophic to evaluate the Mesh Processing BP operation from the background thread, as long as it does not touch any Actors/Assets/Components/Subsystems except the input UDynamicMesh. This is, as far as I am aware, 100% off-book, unsupported usage of Unreal Engine, and may not continue to work in the future. But it does seem to work now, in 5.0, and allows the Mesh Processing BP to be executed asynchronously. To enable this, the UMeshProcessingBPToolOperation BP base class has a second function, GetEnableBackgroundExecution, that you can override in the BP to return true (instead of default false).
UMeshProcessingBPTool Parameters
One caveat with the MeshProcessingBPTool (and the UActorClickedBPTool) is that there is currently no way for the Blueprint to expose parameters in the Modeling Mode Tool Settings panel without making some C++ modifications. The way I have done it in the sample is to make a small UStruct, FMeshProcessingBPToolParameters, which contains 2 float parameters and 2 integer parameters. An instance of this struct is included in the UMeshProcessingBPToolProperties, which results in it being included in the Tool Settings details panel. A copy of this struct is passed to the UMeshProcessingBPToolOperation::OnRecomputeMesh() function, allowing the UI to be used to control settings in the mesh processing BP. However, of course if you need more parameters or need to do any customization/etc, you will have to edit the C++ struct. This is not difficult, but it’s also not convenient.
The challenge is that only UInteractiveToolPropertySet subclasses can be passed by the Tool to the UI level. This type is currently not extendable in Blueprint, although this could be added in a C++ subclass. One way to possibly approach this problem would be to have the BP Operation subclass provide a set of such Blueprint-defined-Property-Sets. However the Tool would have to query the BP and manage the resulting Property Set instances, and…something…would have to copy values back-and-forth. It seems a bit tricky but perhaps a motivated reader will figure out a solution!
Adding More Tools
To add a new Tool, there are just a few steps
Create your Tool implementation (ie MyNewTool.h and .cpp)
Add a new FUICommandInfo to FSampleModelingModeExtensionCommands, in the header and cpp. This will be used to launch your Tool. The UI_COMMAND macro defines the icon label and tooltip
Add a new icon in the StyleSet in FSampleModelingModeExtensionStyle::Initialize(), as described above, with the label matching the Command from step 2
Add a FExtensionToolDescription struct for your Tool in FSampleModelingModeExtensionModule::GetExtensionTools(), using the right Command and ToolBuilder for your new Tool. You will likely also have to include your MyNewTool.h header (to access the ToolBuilder)
That’s it! When you build and run, your new Tool should be included in the Modeling Mode tool palette.
Miscellany
One last thing to mention is the FExtensionToolQueryInfo struct passed to the IModelingModeToolExtension::GetExtensionTools() function. This data structure is used to provide Modeling Mode’s UInteractiveToolsContext to the Extension, as some Extensions may need access to the Context. In addition, when Extensions are initially being queried for the Tool Palette setup, the Tool Builders are not actually required yet, and creating them can be skipped (in some cases this might be necessary or at least more performant). The FExtensionToolQueryInfo.bIsInfoQueryOnly flag will tell your Extension about this info. But this is optional/advanced usage and probably not something to worry about!
I also just wanted to mention that this Modeling Mode Extension system is not just for third parties, it is also used to add optional toolsets in the UE codebase. In particular the HairModelingToolset plugin adds a small set of tools for working with Groom Assets. These Tools were formerly included directly in Modeling Mode, however by moving them to a separate, optional plugin, they can be left disabled by default, and only enabled for users who need Groom Asset Editing. This is precisely the kind of niche toolset that Modeling Mode Extensions are intended to support.
Conclusions
Modeling Mode Extensions allow third parties to greatly increase the power of Modeling Mode in UE5. Even if you don’t want to write your own Tools from scratch, most existing Modeling Tools can be subclassed and customized to make them work better for specific use cases, and those custom versions exposed via an Extension. I am interested in hearing from readers about what kinds of “Base Tools” they might find useful to build on (particular in the case of Tools that can be customized with Blueprints). For example, I think a “Base BP Tool” that supports a generic brush-style interaction, calling a BP for each brush stamp, could be very interesting. Maybe something to tackle in a future post!
Similarly, if you find yourself trying to write a Tool Extension and hitting a wall, please don’t hesitate to post in the comments or get in touch on twitter @rms80.