Interactive Mesh Processing with libigl in Unreal Engine 4.24
/The code for this tutorial has been updated for UE 4.26 - see the update notes below!
This tutorial describes how to embed libigl triangle mesh processing code inside an Interactive Tool in the Unreal Editor. Interactive Tools are an Experimental feature in UE 4.24, meaning they are not documented or officially supported. However this doesn’t mean they aren’t useful! Using the sample project below, you will be able to select a StaticMesh Actor/Component in the scene, and then start a Tool that applies Laplacian Mesh Smoothing to the underlying StaticMesh Asset. The smoothing parameters (ie sliders, checkboxes, etc) are automatically exposed in a DetailsView panel. The gif to the right shows a quick demo of applying this smoothing to one of the chairs in the default UE scene.
(Of course the point of this tutorial is not just to provide a mesh smoothing Tool, it’s to show you how to create your own Tools inside the Editor. Libigl is just a convenient (and awesome) example.)
(Mandatory Disclaimer: your author, Ryan Schmidt, is an employee of Epic Games)
What is libigl? Why would I want to do this?
Libigl (https://libigl.github.io/) is an open-source C++ mesh processing library (github) initially created by two computer graphics PhD students (now professors) Alec Jacobson (UToronto) and Danielle Panozzo (NYU). If you see a cool SIGGRAPH paper that does something crazy with meshes, there is a good chance it is based on libigl. For example, Alec and his student Derek Liu had a paper Cubic Stylization at SIGGRAPH Asia 2019 that was reviewed on the popular 2-Minute Papers youtube channel (click here to watch). Their code is open-source (github) and built on top of libigl.
So, if you wanted to Cubic-Stylize some of your game assets, you could try to download and compile their software and run it on your objects. However as research software, it’s UI has…limitations (your assets are all OBJ files, right?). If you could get this code running in the Editor as an Interactive Tool, you could apply it to your already-created-and-configured Unreal Assets.
Did I mention that libigl has an enormous tutorial that demonstrates a ton of amazing geometry processing algorithms, with sample code easily cut-and-pasteable? In fact the mesh smoothing in the gif above is just the 205_Laplacian sample code [link] and the purpose of this tutorial is to get you as close as possible to literally being able to cut-and-paste libigl-based code into an Editor Tool.
(By the way, libigl is not the only C++ mesh processing library out there, and the plugin provided as part of this tutorial should be adaptable to any of those, too - details later on.)
UE 4.24 Sample Project & MeshProcessingPlugin
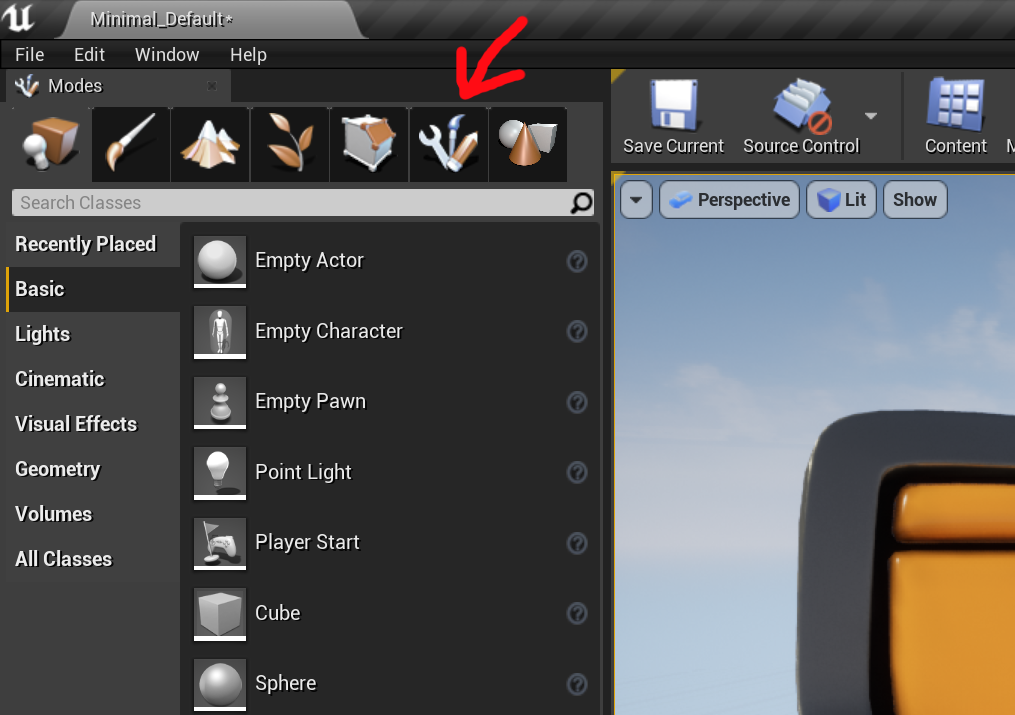
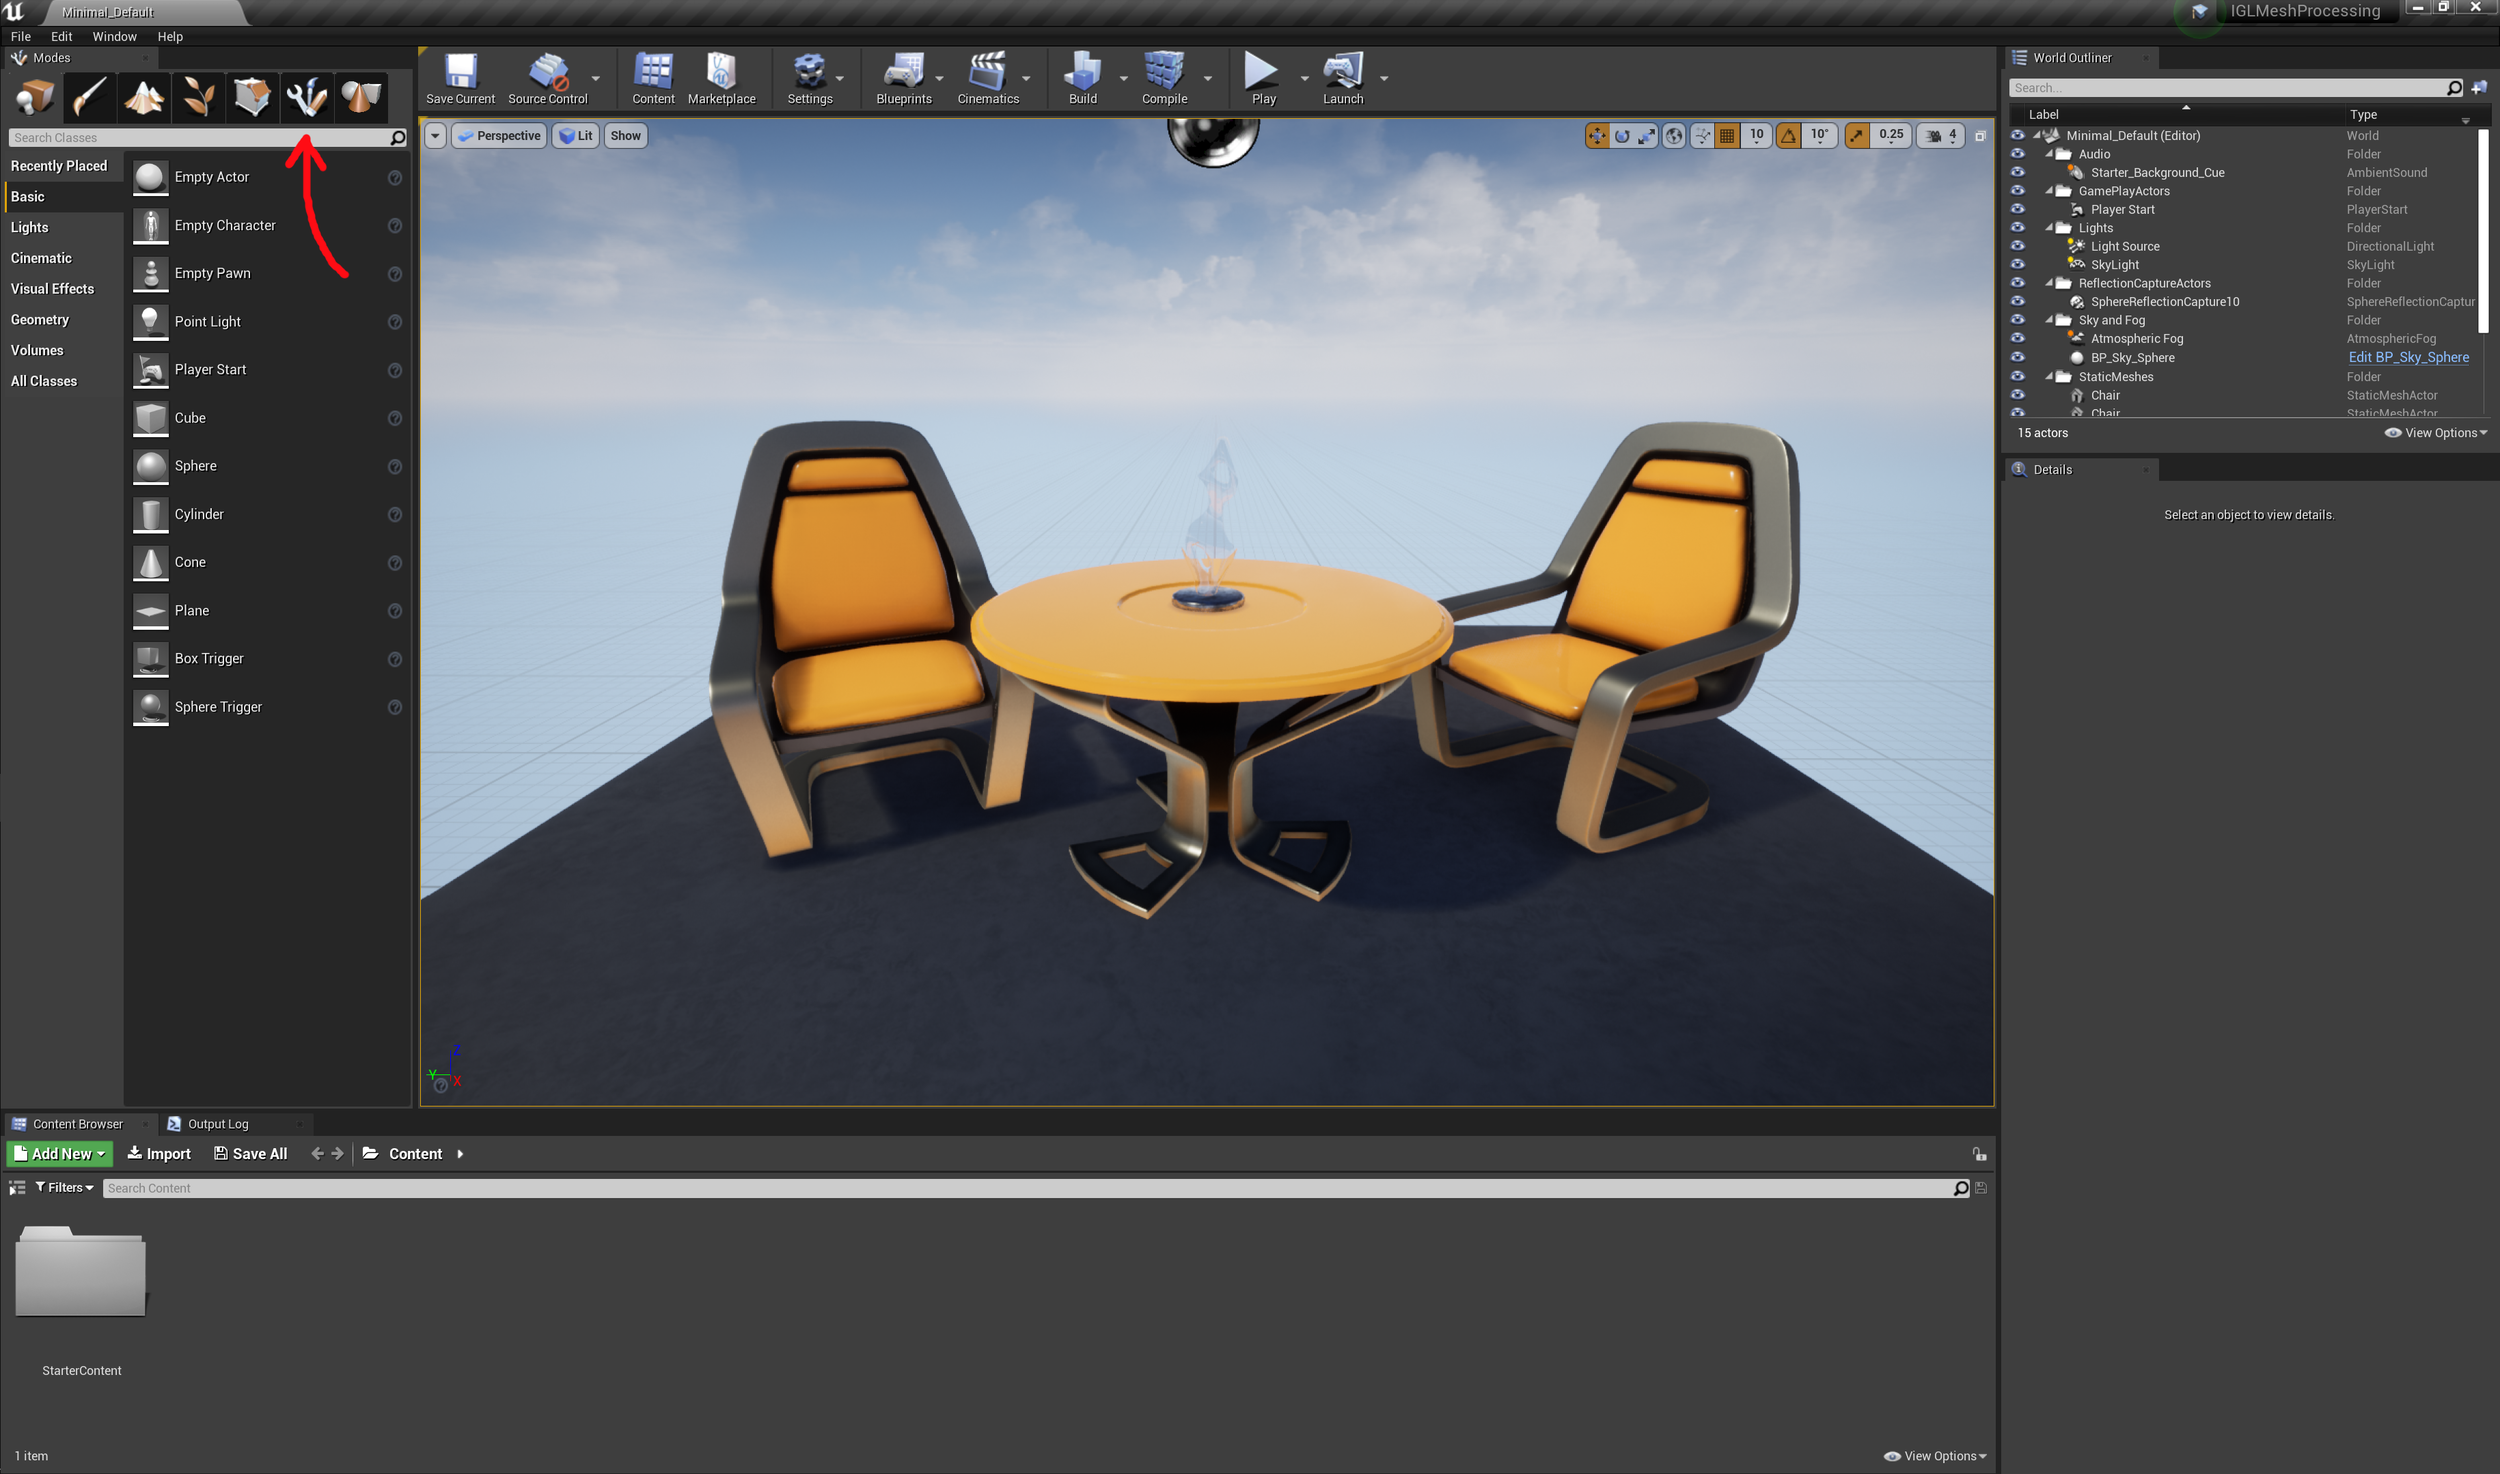
To make it trivial to use libigl inside of UE, I have written a small plugin that provides two things. First, it’s an Editor Mode plugin, which means it adds its own tab in the Editor Modes tab panel on the left-hand side of the Editor. The tab for this mode will have a default “Wrench-Brush-Pencil” icon (see images to right).
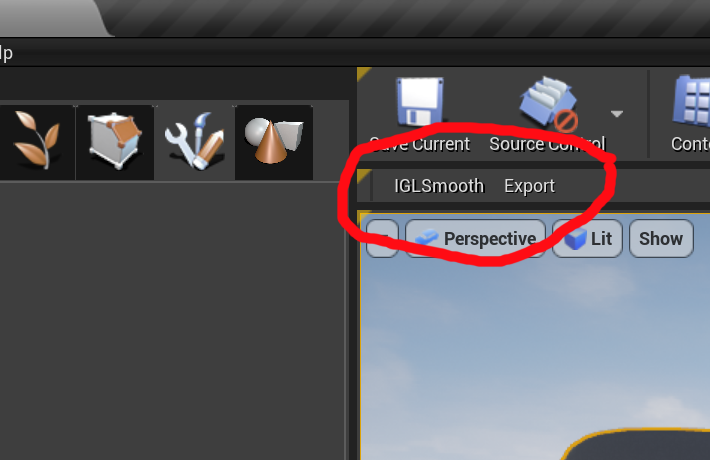
When you select this new mode, a small toolbar of buttons will appear below the main toolbar. It will contain two buttons labeled IGLSmooth and Export. You have to select a StaticMesh object in the viewport to start these Tools. The Export Tool will allow you to export the selected mesh as an OBJ file, but I won’t cover this in more detail in the tutorial.
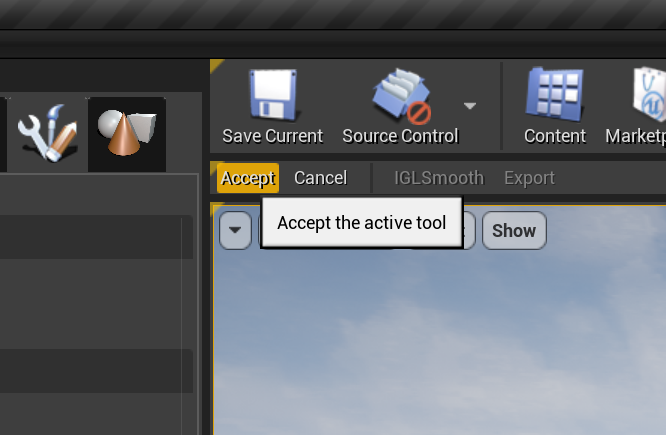
When you start a tool, two additional buttons will appear, labeled Accept and Cancel. A tool is like a mini-mode with a live preview, so what you see in the chair-smoothing gif above is not actually affecting the input StaticMesh Asset yet. Selecting Accept will commit the current preview to the Asset (or Cancel to discard it). Note that clicking Accept edits the Asset but does not save it! You must save the Asset manually (eg Save-All from the File menu, select the Asset and click Save, etc, etc)
And that’s it. This sample project is on Github at github.com/gradientspace/UnrealMeshProcessingTools in the UE4.24 subfolder. The project itself is just an empty default Game C++ project, all the actual code is in the Editor Mode Plugin located in the subdirectory /Plugins/MeshProcessingPlugin/. You should be able to copy that Plugin to another UE 4.24 Project without difficulty, if you prefer.
Note that the Plugin contains copies of libigl and Eigen (an awesome header-only math library that libigl is built on). If you want to use your own copies of these at some other system path, you can edit the quoted strings in Plugins/MeshProcessingPlugin/Source/MeshProcessingPlugin/MeshProcessingPlugin.Build.cs (you can use absolute paths).
Details on how to install UE4.24 and import this sample project are provided below, if you need it. But lets cover the libigl-related parts first.
IGLSmoothingTool Code
The code you need to care about for this tutorial is located in /Plugins/MeshProcessingPlugin/Source/MeshProcessingPlugin/Public/Tools/IGLSmoothingTool.h and Private/Tools/IGLSmoothingTool.cpp. There are roughly 40 lines of non-whitespace/comment code between these two files, so there really is not much to it beyond the actual libigl code. I’ll describe all the salient parts. It will feel a bit like magic that this works. Don’t worry about it - that’s the whole point of the Editor Tools Framework! There are 3 objects we have to provide for the magic to happen - a ToolBuilder, and PropertySet, and the Tool itself:
The ToolBuilder
UIGLSmoothingToolBuilder is a trivial factory class that creates instances of UIGLSmoothingTool. The ToolBuilder code should be straightfoward, it’s just allocating a new object using NewObject<T>, which is an Unrealism for creating new UObject-derived subclasses (many things in Unreal are UObjects). If this is your first exposure to Unreal Engine you might note that all classes/structs are prefixed with U or F. U means UObject, F is everything-else (just go with it for now). Similarly just ignore the UCLASS() and GENERATED_BODY() macros. Unreal has a custom pre-processor/code-generator that parses these macros, so they have to be there.
The PropertySet
Next is UIGLSmoothingToolProperties. This is a UInteractiveToolPropertySet implementation, which means it provides a list of configuration variables that will appear in the properties panel on the left-hand side of the Editor when the Tool is active. When you change a property the Tool will recompute the preview. The properties have to be annotated with UPROPERTY() macros but again you can cut-paste what is there if you wanted to add more (only certain types are supported though - stick to int/float/boolean, and enums if you need it, see the MeshExportTool.h header for an example). Note that as long as you initialize the values in the header you don’t need anything for this class in the cpp file.
The Tool
Finally we have UIGLSmoothingTool. The header declaration of this class isn’t really important, if you want to change the libigl code all that matters is the implementation of the ::MakeMeshProcessingFunction() function. I have included the code for this function below (slightly edited to compact it vertically).
The basic task of this function is to create and return a lambda that updates the input FDynamicMesh3 (our editable Unreal mesh). To do that with libigl we will first have to convert the mesh vertices and triangles to matrix format. The rest of the code is taken from libigl sample Laplacian_205 (github), lightly edited to remove the origin scaling/translation in that sample (otherwise we would need to invert that transformation).
TUniqueFunction<void(FDynamicMesh3&)> UIGLSmoothingTool::MakeMeshProcessingFunction()
{
    // make local copies of current settings
    int SolveIterations = Properties->Iterations;
    float Smoothness = Properties->Smoothness;

    // construct compute lambda
    auto EditFunction = [Smoothness, SolveIterations](FDynamicMesh3& ResultMesh)
    {
        Eigen::MatrixXd V;      Eigen::MatrixXi F;
        iglext::DynamicMeshToIGLMesh(ResultMesh, V, F);    // convert FDynamicMesh3 to igl mesh representation

        Eigen::SparseMatrix<double> L;
        igl::cotmatrix(V, F, L);    // Compute Laplace-Beltrami operator L

        Eigen::MatrixXd U = V;      // smoothed positions will be computed in U

        for (int k = 0; k < SolveIterations; ++k)
        {
            Eigen::SparseMatrix<double> M;     // Recompute mass matrix on each step
            igl::massmatrix(U, F, igl::MASSMATRIX_TYPE_BARYCENTRIC, M);

            const auto& S = (M - Smoothness * L);
            Eigen::SimplicialLLT<Eigen::SparseMatrix<double>> solver(S);
            U = solver.solve(M * U).eval();    // Solve (M-delta*L) U = M*U
        }

        iglext::SetVertexPositions(ResultMesh, U);   // copy updated positions back to FDynamicMesh3
    };

    return MoveTemp(EditFunction);  // return compute lambda
}
The conversion between the FDynamicMesh3 and the libigl V/F mesh format is done by utility code in /Tools/IGLUtil.h. If you want to use some other mesh library, you will need to write similar converters. FDynamicMesh3 supports many capabilities not available in most open-source mesh libraries, such as split normals, multiple layers of UV maps, deleting vertices and triangles, etc. This class is a ported and evolved version of the DMesh3 format from the geometry3Sharp library, which I documented here, if you are interested in using it directly.
Note also that the local copies of the configuration settings SolveIterations and Smoothness are pretty important (see extended comments in the github cpp). The lambda we return here (TUniqueFunction is an Unreal version of std::function) will be called from a different thread. So we cannot reference the Properties object directly.
Note also that multiple instances of the lambda may execute simultaneously, as the Tool framework will spawns new computations when the user edits settings, rather than wait for the previous one to finish. If your code is going to depend on global variables/etc, you will need to use a lock. Unreal’s FCriticalSection is an easy way to do this (please post in the comments if you would like me to add instructions on doing this, or handle it in the parent MeshProcessingTool).
That’s it! (p.s. Live Coding)

You now know everything you need to do to write libigl code that will be run inside an Interactive Tool in the Unreal Editor. That’s really all there is to it. You can edit the libigl code in Visual Studio, hit Play to recompile and launch the Editor, and try out your changes. This is the development loop for Unreal Engine.
….except, Unreal Engine also supports hot reloading of C++. This feature is called Live Coding and it will let you iterate much more quickly. Live Coding is not enabled by default, but if you click on the Compile drop-down arrow in the main toolbar, you can toggle on Enable Live Coding (see image to the right).
Then you just hit Ctrl+Alt+F11 in the Unreal Editor to recompile and patch the currently-running Editor. The Live Coding Log Window will show compiler output and/or errors. Note that some changes cannot be made with Live Coding. In particular, you cannot add/edit UPROPERTY() fields in the Properties object - changes to those require a restart. (In this context I do recommend Cancelling out of the Tool before doing the hot-reload, otherwise you might get crashes when you Cancel later).
Detailed Setup Instructions
The instructions above explain how to do the libigl part of this tutorial. However if you are new to UE4, it might not be obvious how to get to the point where you will be able to edit that block of libigl code. So, this section will walk you through it step by step.
Step 0 - Pre-requisites
To do anything with Unreal Engine you will need to have a C++ development environment set up. Currently this tutorial only works on Windows, so you will need to install Visual Studio - I used Visual Studio Community 2019 which is free and can be downloaded here.
You also need to get the sample project from Github, at https://github.com/gradientspace/UnrealMeshProcessingTools. The simplest way to get the project is to just download a zip of the repository, which you can do by clicking here. Alternately you can clone out and/or fork the repository - you’ll have to find instructions on doing that elsewhere, though.
Between Visual Studio and Unreal Engine you will probably need about 30 GB of free disk space. If you are hurting for space, you should be able to customize the configuration of each to get it down to maybe 15GB total.
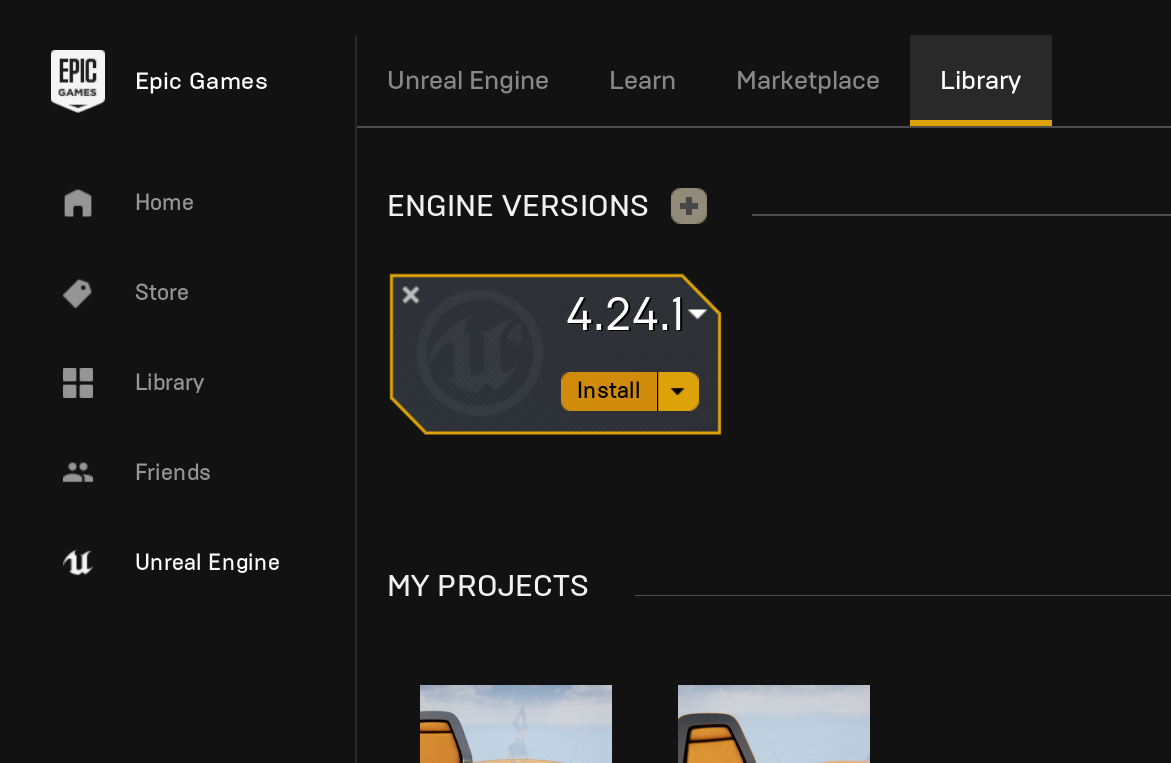
Step 1 - Install Unreal Engine version 4.24.x
You will need to have installed Unreal Engine 4.24 to use this tutorial. Go to https://www.unrealengine.com and click the Download button in the top-right. You will have to sign up for an Epic Games account, then download and run the Epic Games Launcher, and sign in to the launcher with that account.
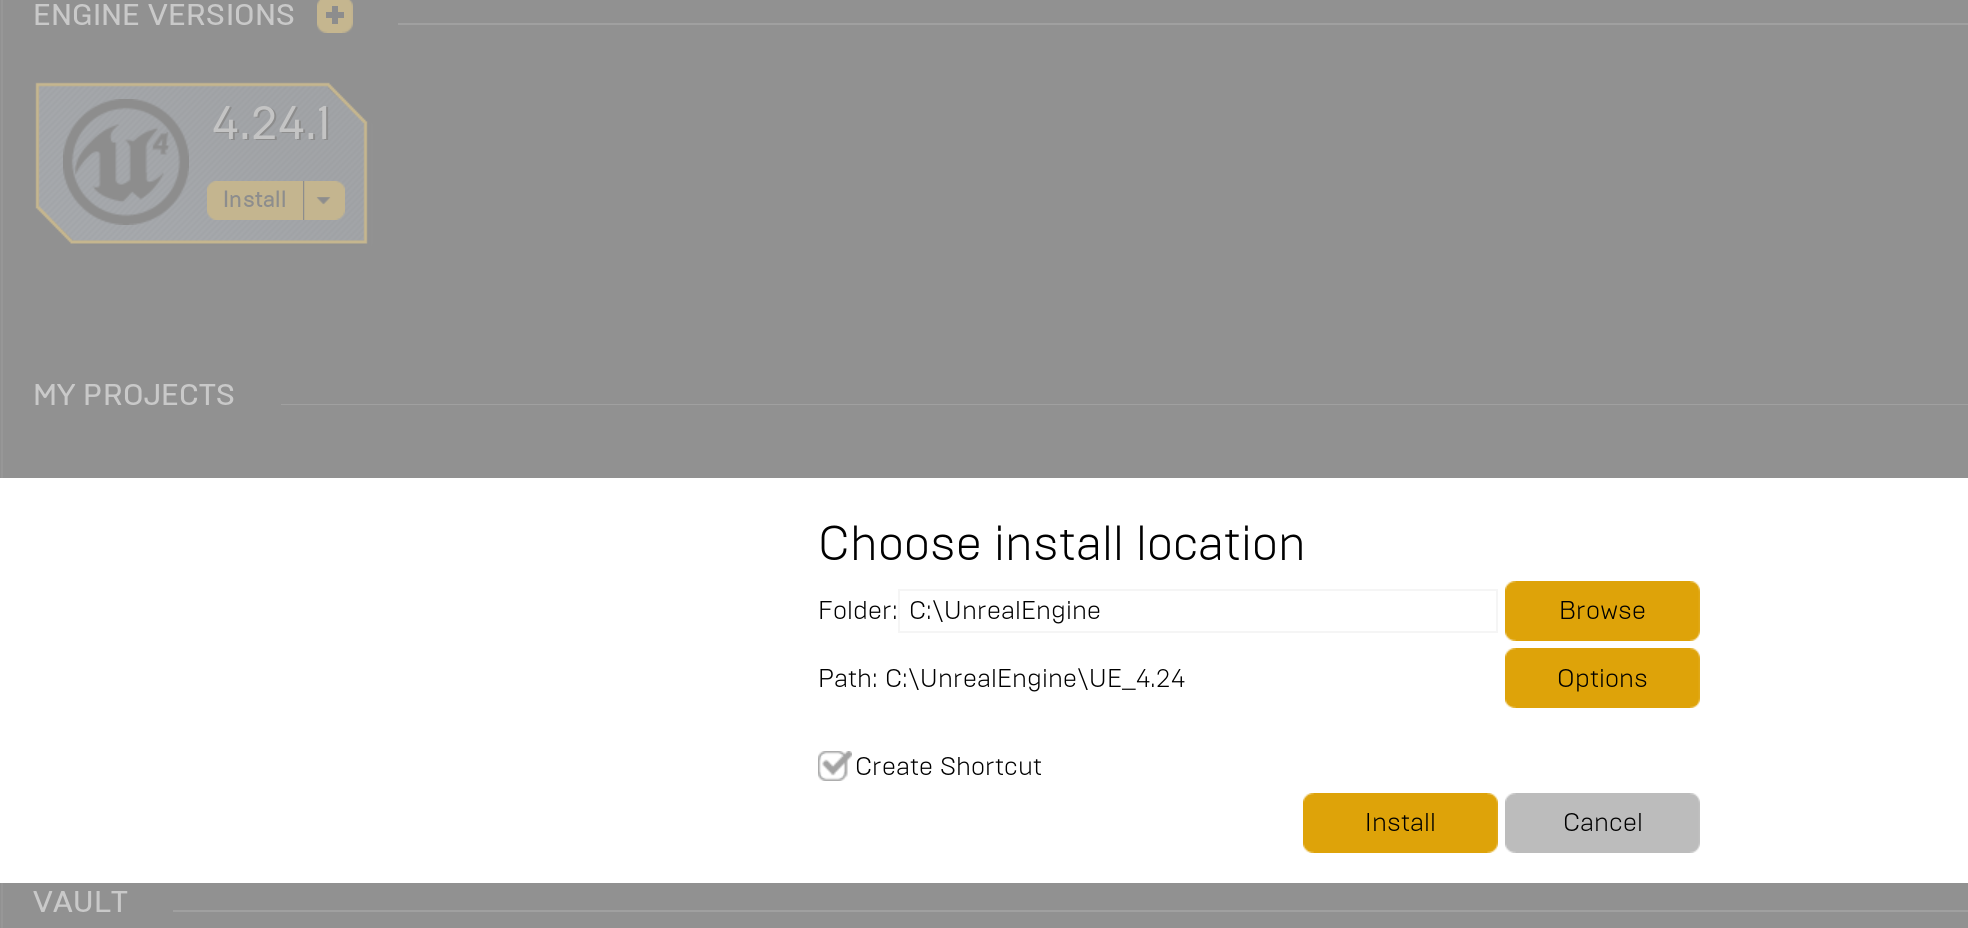
Once you have done that, follow the instructions to the right to install Unreal Engine. Click the thumbnails on the bottom to see instructions for the various steps in the image captions. You can save some disk space by disabling support for the various platforms (Android, iOS, etc), as we’re only using the Editor. But don’t disable the Starter Content Packs, or you won’t have anything in the scene to work with.
I also strongly recommend that you check the box to include the full Engine/Editor source (not shown in the images). Being able to look at the Engine source can be extremely useful both for debugging and just for seeing “how things are done” when you want to do something similar. Entrian Source Search is quite good for this kind of Engine code spelunking.


Step 2 - Open The Sample Project
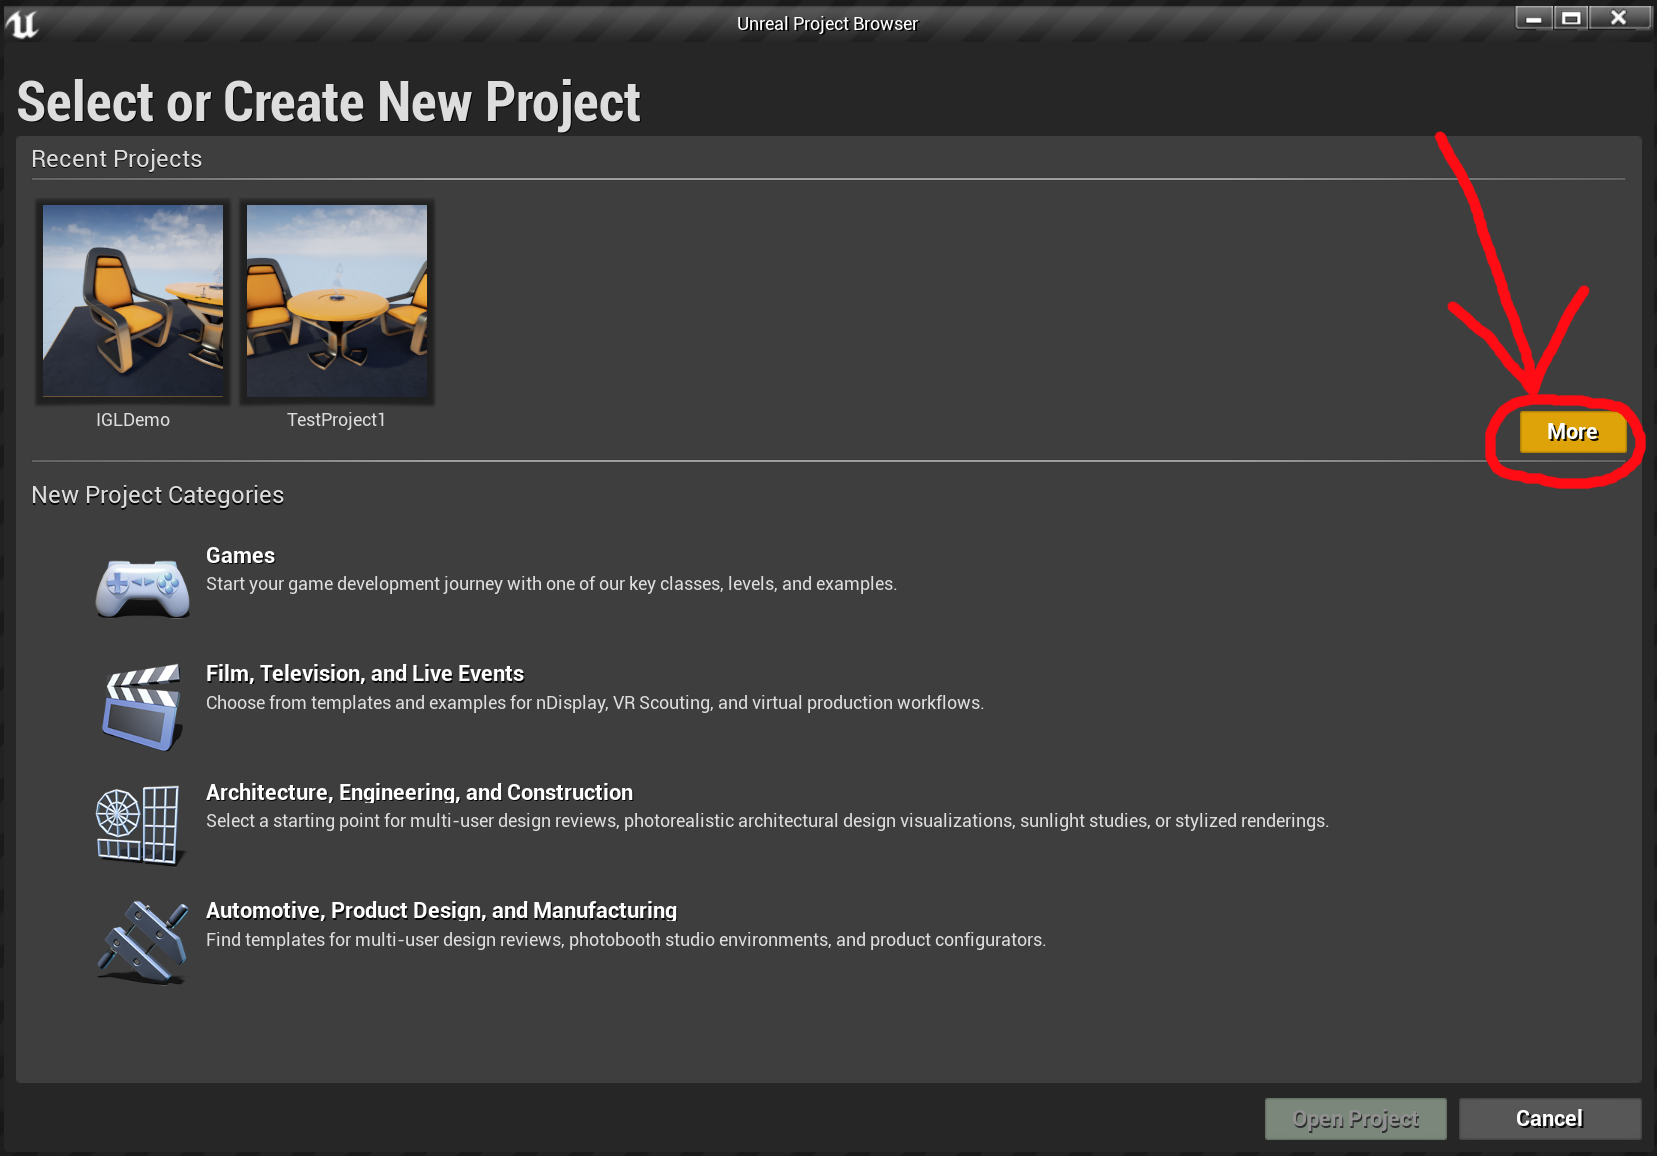
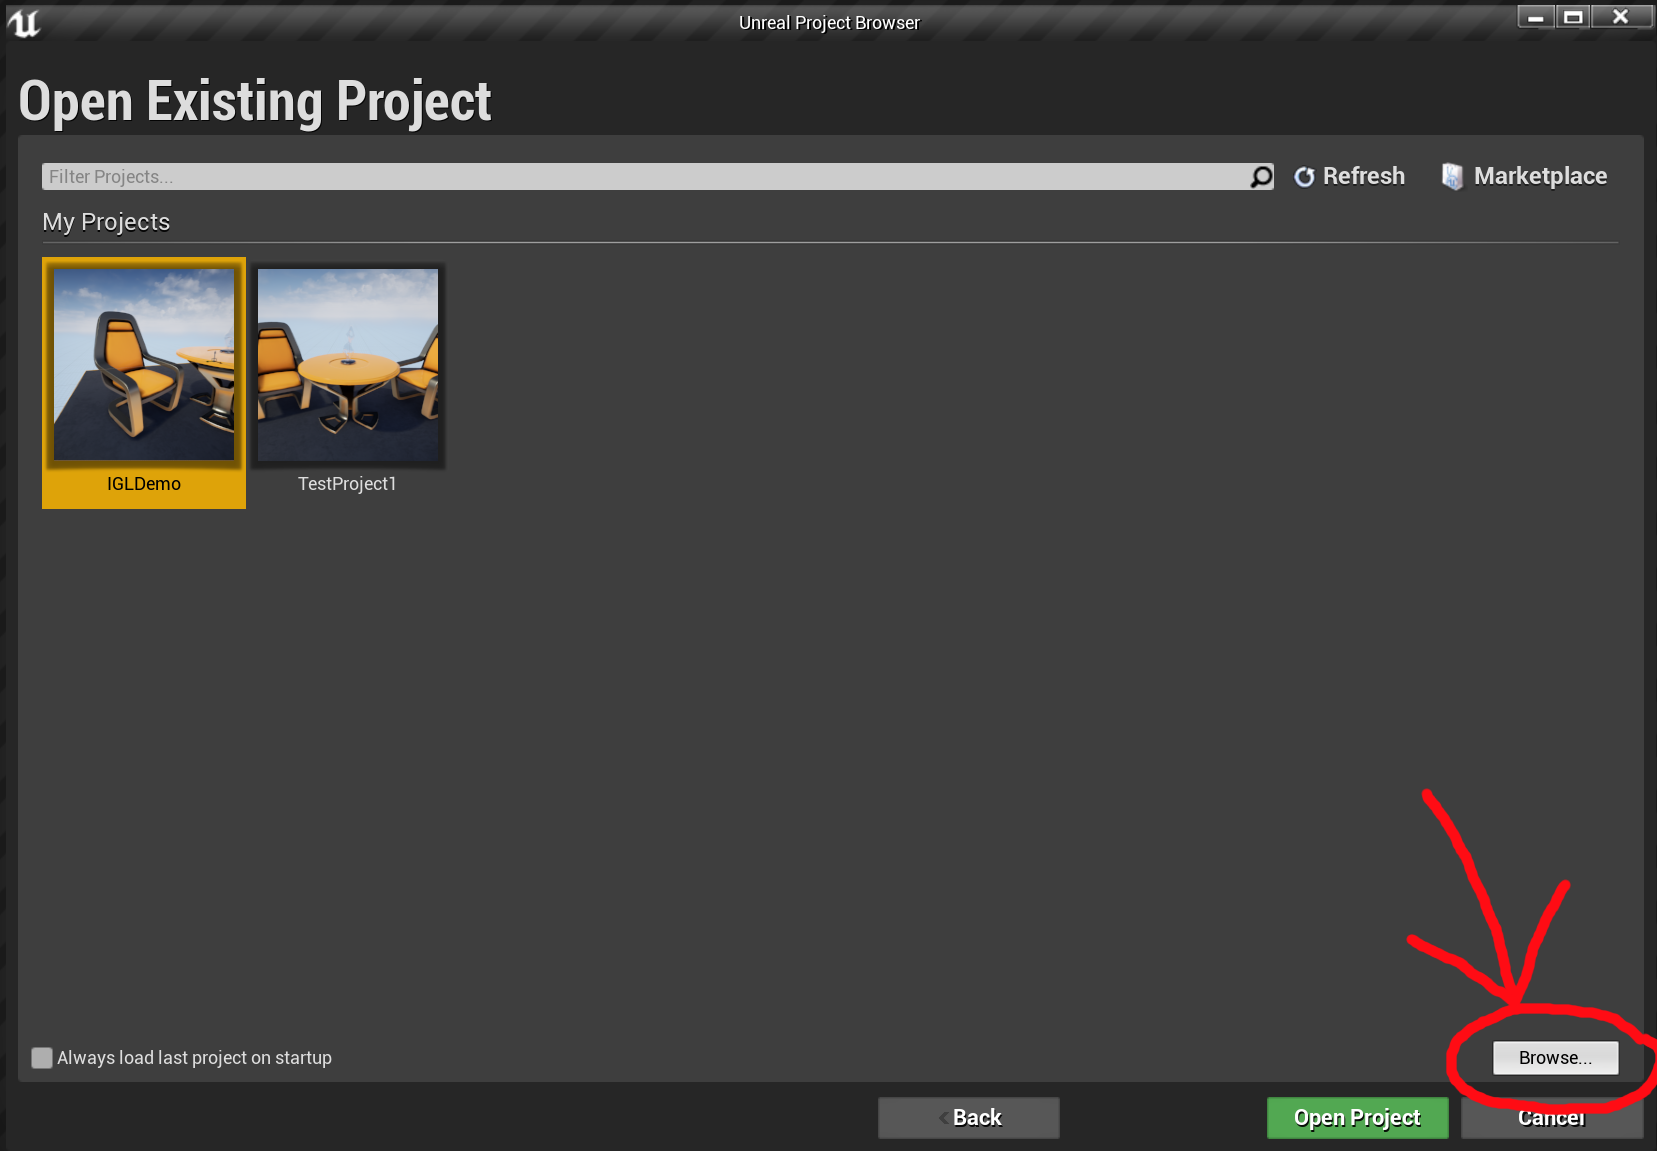
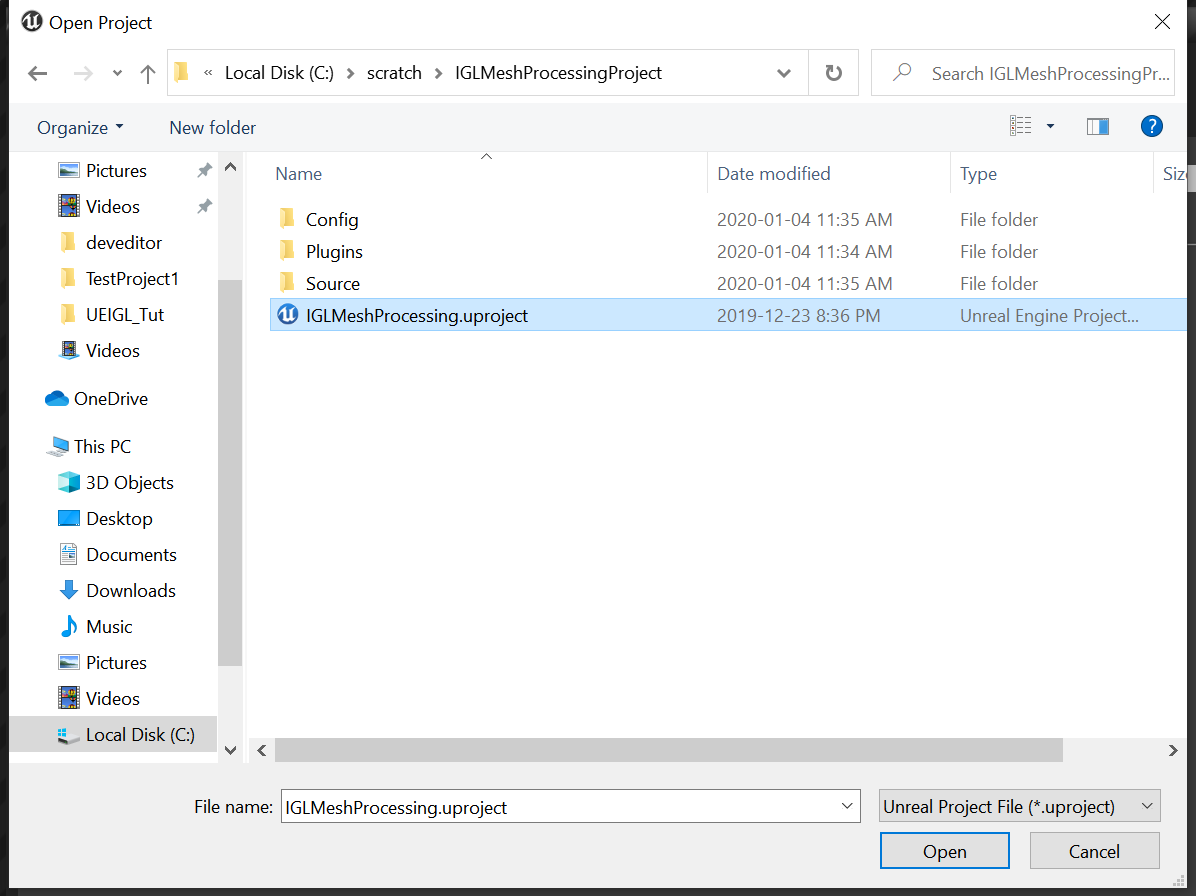
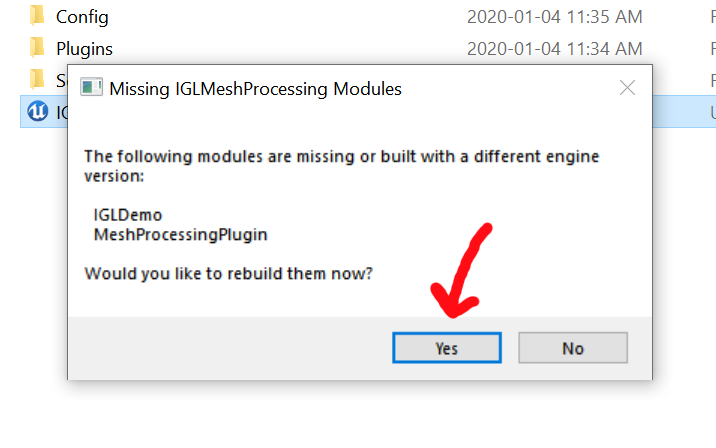
Once you have installed Unreal Engine, the greyed-out Launch button in the top-right of the Epic Launcher will turn orange. Click that button to start the Unreal Editor. The first screen you see will be the one on the right, to Select or Create New Project. Follow the instructions in the images. You will open and compile the project you downloaded from Github, and then the Editor will launch with that project.
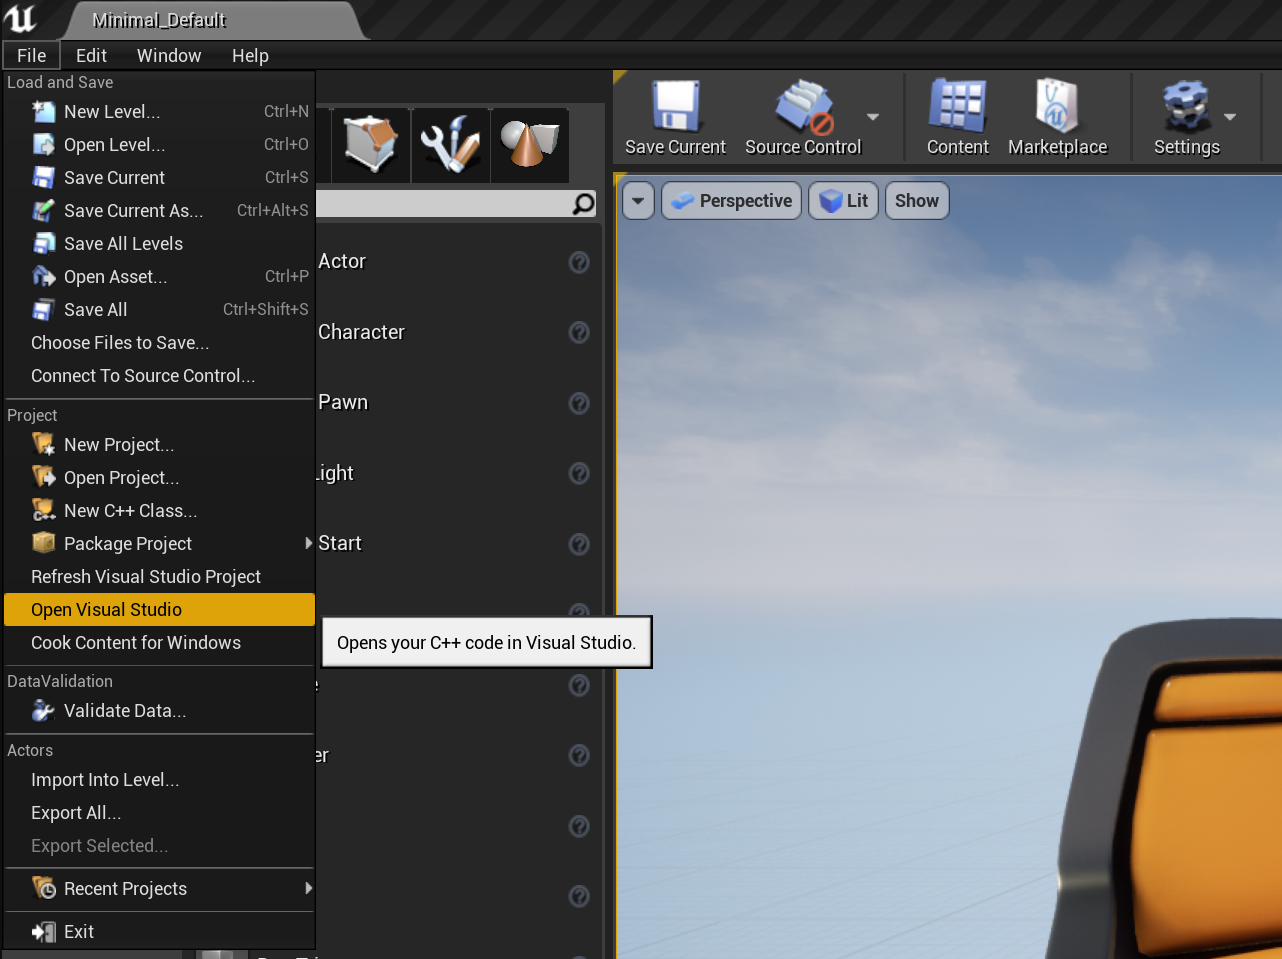
Once the Editor launches you can run the IGL Smooth Tool described above, by switching to the Mesh Processing Editor Mode. To get to the C++ code, you will need to first run Generate Visual Studio Project from the File menu, then Open Visual Studio, again from the File menu, to launch VS with the project code open.
Once you have launched Visual Studio, close the instance of the Unreal Editor that you already opened. When you are working with the C++ code it is likely that you will need to relaunch the Editor frequently (eg after code changes…or crashes), and also use the debugger, and this is all much smoother if launching from Visual Studio.
Step 3 - Working in Visual Studio
The image to the right shows the expanded code tree for the IGLMeshProcessing plugin in Visual Studio (click to enlarge it). /Plugins/ is the top-level plugins directory, below that /MeshProcessingPlugin/ is our plugin, then /Source/ is where the source code modules are, and then we have another /MeshProcessingPlugin/ folder, this is the Module and probably should have been named differently (my mistake). A Plugin is a collection of Modules, and each Module will become a separate DLL (Modules link to other Modules, Plugins are just an organizational structure).
Finally we have the /Private/ and /Public/ folders. Generally headers containing types we may need to export (in the DLL) go in /Public/ and everything else goes in /Private/. The IGLSmoothingTool code is in the /Tools/ subdirectory. We could (should?) have put the actual Tools code in a separate Module from our Editor Mode but that would complicate this sample project.
Click the Start Debugging button in Visual Studio (green triangle in the top toolbar) to launch the Editor with the IGLMeshProcessing project.
If you want to add additional Tools, the simplest thing to do is just duplicate the IGLSmoothingTool.h and .cpp, and string-replace “IGLSmoothing” with something else. If you do this, you may also need to manually “Regenerate Project Files”. You can do this by right-clicking on the IGLMeshProcessing.uproject file and selecting Generate Visual Studio project files. Visual Studio will prompt you to reload the solution, click Yes to All.
Step 4 - Import, Export, and Assets

At this point you can edit the code, run the project, and apply your libigl code to the default meshes in the scene. If you want to import other objects, you will need to know a tiny bit about the UE4 Asset system. UE4 does not have a “scene file” that contains mesh data, like you might have in Maya or Blender. In UE4 every mesh is a separate “Asset” with is stored in a .uasset file.
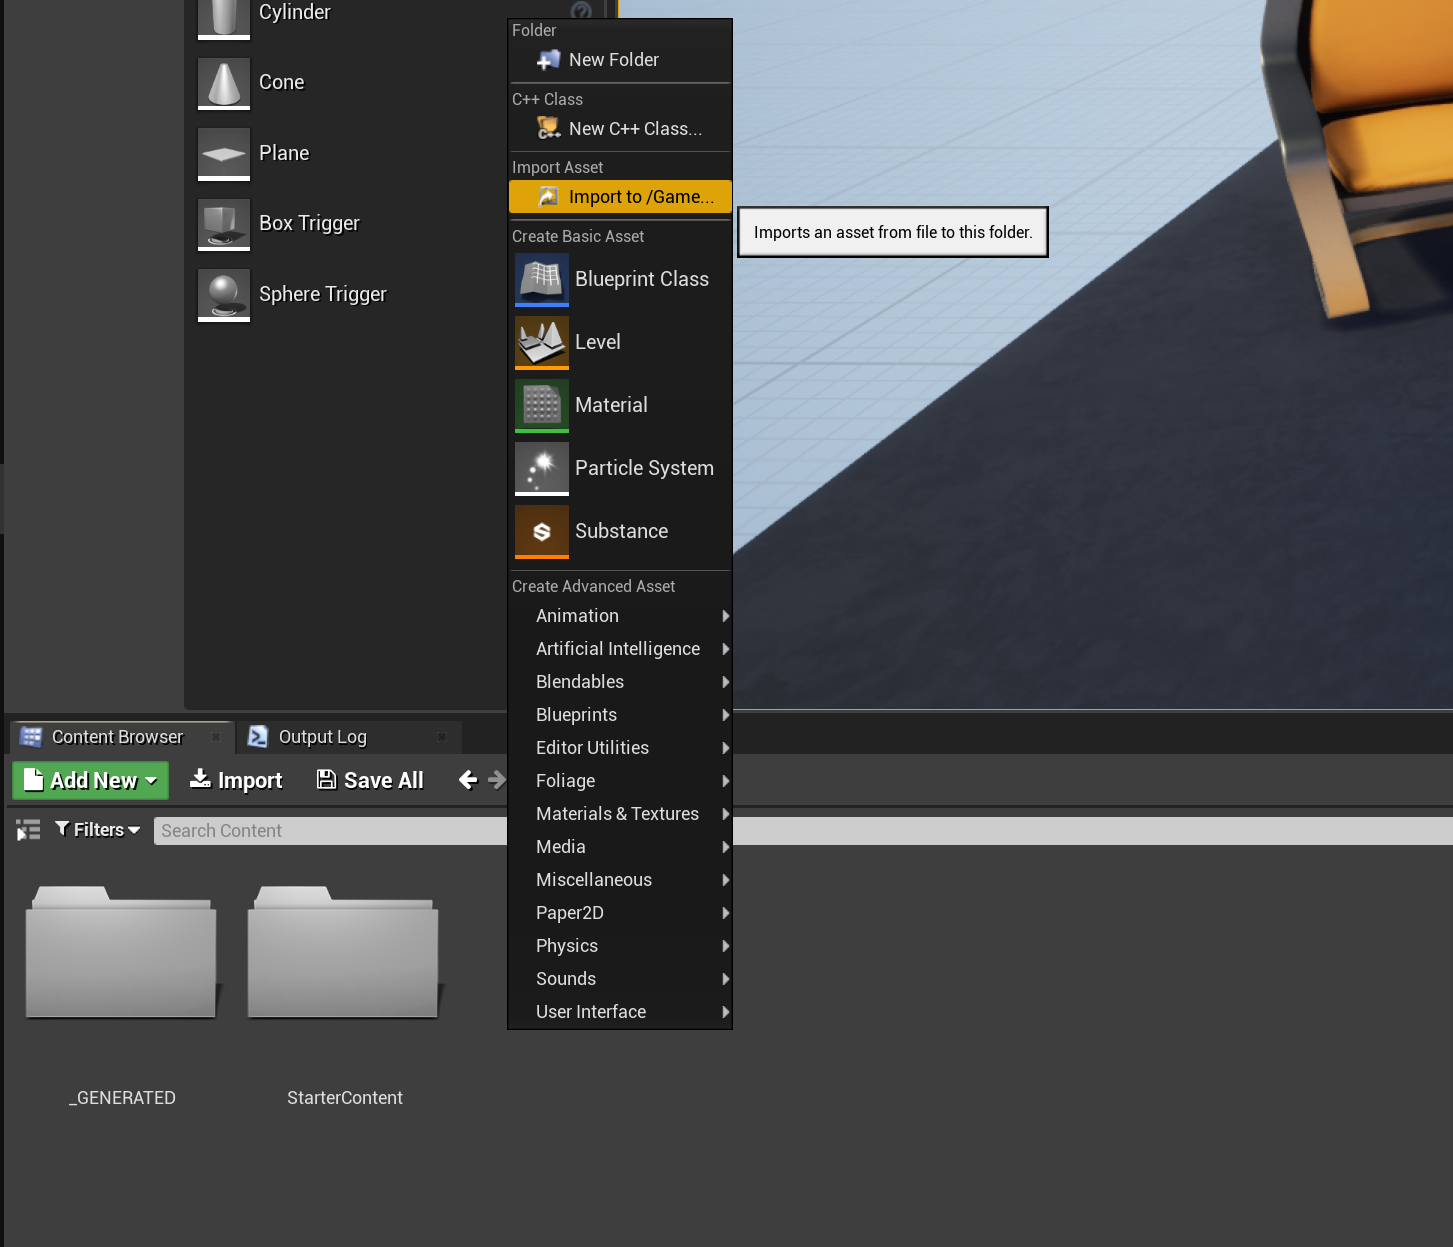
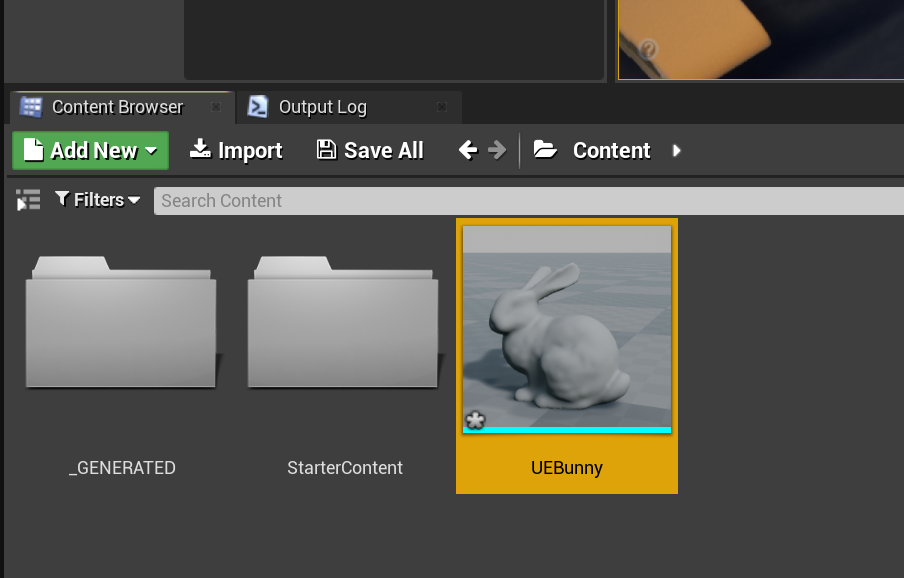
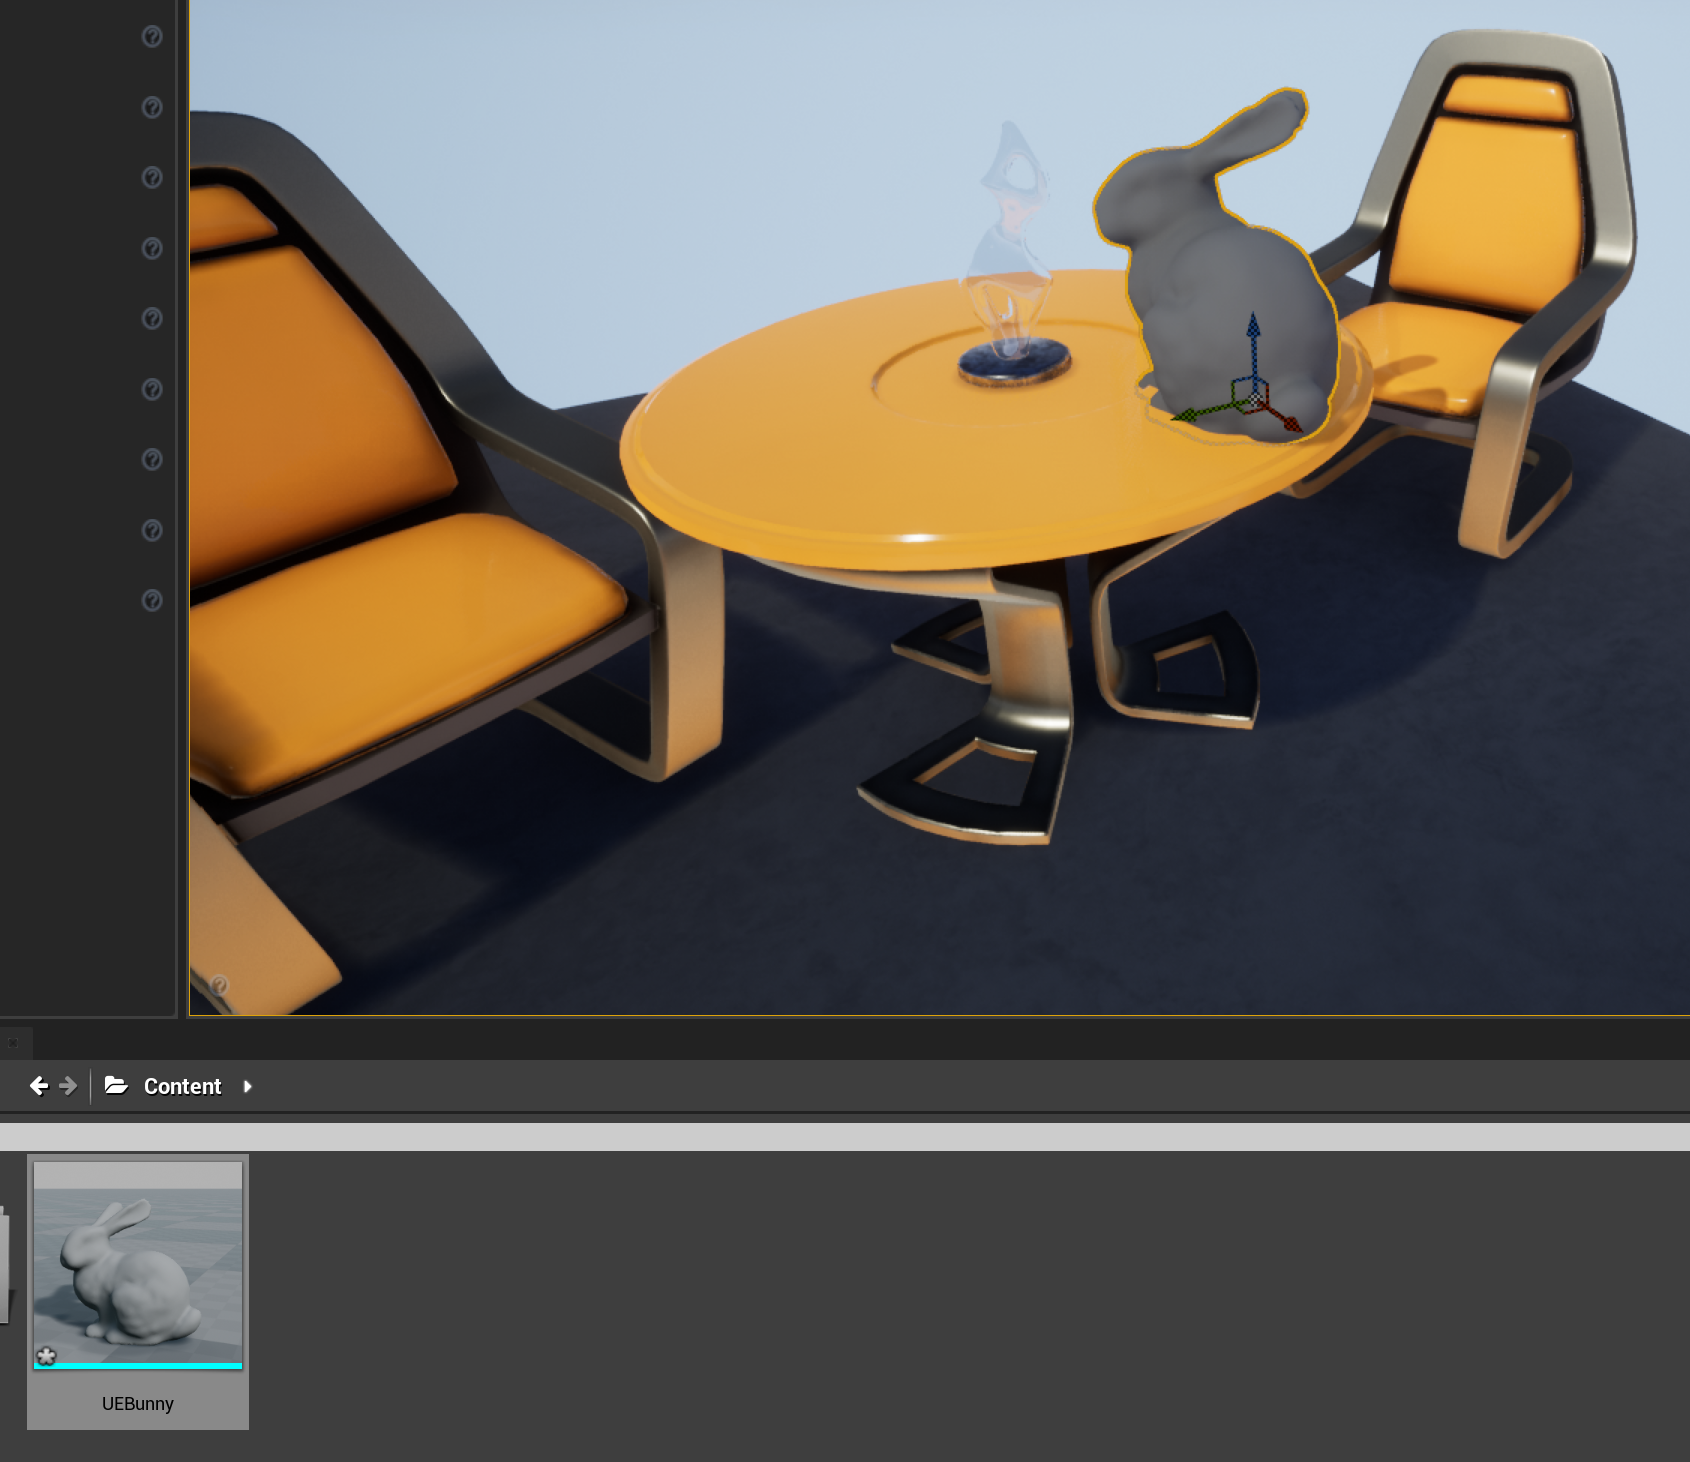
To Import a mesh file (OBJ, FBX, and a few other formats) as an asset, right-click in the Content Browser (the part on the bottom) and select Import to /Game. Select your file and then the FBX Import Options dialog will pop up (the FBX importer is used for OBJ files too). For “geometry processing” meshes, I recommend disabling creating of Materials. You should also un-check Remove Degenerates, or small triangles will be deleted on import (yes this is really the default). Also check Combine Meshes unless you are sure you want multiple objects (any ‘g’ or ‘o’ lines in an OBJ file will result in a separate mesh asset). Finally click Import All. If you were to do this with this bunny OBJ file (click), you would end up with a StaticMesh Asset named UEBunny. You can then drag-and-drop that mesh into the scene.
Click through to the last image on the right, and you will see a star indicator ( ☆ ) on the imported UEBunny Asset icon. This means the Asset is in the modified-but-unsaved state. Assets are saved separately from the actual scene in UE, and an imported Asset is not explicitly saved. You must either Save All (Ctrl+Shift+S) or select the Asset itself and hit Ctrl+S to Save (or use Save from the context menu). When you do this, you create a new file UEBunny.uasset in the top-level Content folder. Similarly when you edit the Asset with the IGL Smooth Tool, it will be modified but unsaved. If you shut down the Editor, you will be prompted to save any modified-but-unsaved Assets. You can skip this if you don’t want to save it. In any case, your imported mesh will not be modified or affected by what you do inside Unreal, because you are working with the Asset file, not the OBJ/FBX/etc (which is called the “Source File” in UE terminology).
Note that you can easily Re-import an external mesh by right-clicking on the Asset and selecting Reimport. Unreal remembers the import settings in the uasset file. If your mesh doesn’t import correctly (for example if there are “cracks”) you might try some of the mesh repair tools in Modeling Mode (see below).
You can Export a StaticMesh Asset by right-clicking on it and selecting Asset Actions and then Export. FBX and OBJ format are supported, however the OBJ exporter exports each triangle separately (ie more like an STL file). For your Geometry Processing experiments you might want that connectivity. In that case, use the Export button in the Mesh Processing Editor Mode, which will allow you to export an OBJ file using the MeshExportTool I have provided.
Finally, note that Unreal uses a left-handed Z-Up coordinate system (more details here). It’s unlikely that you are using this same system (it is a bit unusual outside of game engines). For example Maya and Meshmixer use right-handed Y-Up, while Blender and 3DS Max use right-handed Z-Up. The FBX Importer will convert OBJ format from right-to-left handed (and FBX specifies handedness in the file) but will not modify the Up direction. The Mesh Export Tool defaults will export right-handed Y-Up suitable for use in Maya and Meshmixer (my preferred external tools), but you can change the options.
Finally Finally, the default units in Unreal are centimeters. So an object on the scale of a unit-box (ie good for algorithms) will be tiny compared to the default ground-plane-box (which is 5 meters wide). Also note that if you scale an object in the 3D viewport using the 3D gizmo, that’s just modifying a Transform on the StaticMeshComponent, not the actual local coordinates of the mesh vertices in the Asset.
MeshProcessingPlugin Details
IGLSmoothingTool is the “end-goal” for the MeshProcessingPlugin, allowing you to write a tiny bit of libigl code that will drive a relatively complex underlying system. Much of that system is part of UE 4.24, however a few parts were written specifically for this tutorial. If you want to know how they work, here are some details (and if you don’t - skip this section!)
MeshProcessingTool
The UIGLSmoothingTool class shown above is based on a parent Tool implementation called UMeshProcessingTool. This Tool provides the “glue” that allows our libigl code to manipulate a UE4 StaticMesh Asset without really having to know anything about UE4. This interface is provided by way of the Interactive Tools Framework. UMeshProcessingTool implements UInteractiveTool (by way of USingleSelectionTool), which is the base interface for Interactive Tools in the Framework. You can think of an Interactive Tool as a “mini-mode” in the Editor - when a Tool is active it is Ticked each frame, has the opportunity to do things like debug line drawing in it’s Render function, provides sets of editable properties that are shown in the Mode Panel, and can do things like handle mouse input or create 3D gizmos (we aren’t using those capabilities in this tutorial, though).
UMeshProcessingTool::Setup() creates an instance of an object called UMeshOpPreviewWithBackgroundCompute, which does most of the heavy lifting. This object (lets called it MOPWBC for short :P) implements a common UX pattern in which we want to edit a mesh based on a set of properties, and show a live preview, and we want the edit computation to run in a background thread so it doesn’t freeze the Editor. The “edit a mesh” operation is expressed as a FDynamicMeshOperator, and MeshProcessingTool.h defines a subclass FMeshProcessingOp that basically just owns and runs a lambda that edits the mesh. This lambda is provided by the ::MakeMeshProcessingFunction() we defined above. MOPWBC takes the FDynamicMeshOperator instance created by UMeshProcessingTool::MakeNewOperator(), gives it to a background thread to execute, and when the execution finishes, it uses the result mesh that was returned to update a UPreviewMesh instance that the MOPWBC also creates and manages (magic!).
UPreviewMesh is an independent utility object, that can be used to display the result of interactive mesh editing - it creates and manages a temporary Actor with a special mesh component (USimpleDynamicMeshComponent) that is faster to update than a normal UStaticMeshComponent. The input StaticMeshActor/Component are hidden while the Tool is active, and updated when you click the Accept button. If you click Cancel, they are never modified.
MeshProcessingPlugin Editor Mode, and Adding New Tools
The Mesh Processing Editor Mode is also provided by the Plugin. This is really getting into Unreal Editor dark arts, however what I have done here is basically a stripped down version of several built-in experimental Editor Modes - the ModelingToolsMode and SampleToolsMode Plugins (both located in /Engine/Plugins/Experimental/). The Modeling Tools Mode in particular has many more features than our basic mode (including icons!). In each case we have a subclass of FEdMode, which is how we get our own tab in the Editor Modes tab panel. You can create an FEdMode from scratch by selecting the Editor Mode type in the New Plugin dialog (like I said, dark arts).
The vast majority of the code at this level is boilerplate code you will won’t have any reason to modify. However if you want to add additional Tools - ie more buttons like “IGL Smooth” and “Export” in the toolbar - you will have to add 5 lines of code in specific places. Lets say your new tool is called UIGLSimplifyTool (perhaps based on libigl sample 703_Decimation) and you want the button to say “IGL Simplify”. Then you add the following lines:
1) In MeshProcessingPluginCommands.h, add a new command:
TSharedPtr<FUICommandInfo> BeginIGLSimplifyTool;
2) Configure that command in MeshProcessingPluginCommands.cpp:
UI_COMMAND(BeginIGLSimplifyTool, "IGLSimplify", "Start the LibIGL Simplify Tool", EUserInterfaceActionType::Button, FInputChord());
3) In MeshProcessingPluginEdMode.cpp, include your tool header and then in ::RegisterModeTools(), add a call to RegisterToolFunc() for your new Tool and Command:
#include "Tools/IGLSimlpifyTool.h"
...(snip)....
RegisterToolFunc(PluginCommands.BeginIGLSimplifyTool, TEXT("IGLSimplifyTool"), NewObject<UIGLSimplifyToolBuilder>());
4) in MeshProcessingPluginEdModeToolkit.cpp, in function ::BuildToolPalette(), add your new Command to the Toolbar.
ToolbarBuilder.AddToolBarButton(Commands.BeginIGLSimplifyTool);
That’s it! Done! New Tool appears in the Toolbar!
Modeling Mode in UE 4.24
I mentioned Modeling Mode several times above. This is another new Experimental feature of UE 4.24, which is built on the same Interactive Tools Framework that we used to create the IGLSmoothTool. It is much more extensive, and includes a variety of Mesh Editing and Repair Tools. By default this Mode Plugin is not enabled, and you have to open the Plugins browser and enable the Modeling Tools Editor Mode Plugin to turn it on. However in the IGLMeshProcessingProject I have already enabled it in the settings, so if you switch to the tab with the “Sphere-Cone-Box” icon, you will get a set of tabs and icons in the Mode Toolbar (Most Tools will be disabled unless you have a suitable object(s) selected):

Modeling Mode is relevant to this tutorial because there is a reasonable chance you might need to massage input data to experiment with mesh processing code. For example the FBX/OBJ importer frequently leaves “cracks” in objects along material boundaries. You can use the Inspector Tool to see if this is the case (it will highlight boundary edges in red), and if there are cracks, the Weld Edges Tool can probably repair them.
Another problem you might come across is that many game Assets have very coarse “low-poly” triangulations that are not suitable for most research geometry processing algorithms. The Remesh Tool can be used to add triangle density to these meshes without ruining the UV coordinates or hard normals. The image on the right shows the result of Remeshing the table from the standard UE scene.
The images below show the results of the IGLSmooth Tool on the default Table asset (left) and the remeshed triangulation (right). The remeshed version has better (ie more consistent and “smoother”) behavior because there is more freedom to move the vertices, and because numerically the “energy” that is minimized to compute the smoothed version is better-behaved numerically on more even triangulations. You can always use the Simplify Tool to get rid of these extra triangles after the processing. (PS: the Remesher in Unreal is incredibly powerful and you might find it quite useful to mix with libigl code! Check out RemeshMeshTool.cpp in the MeshModelingToolset plugin for sample code.)
Using Other Mesh Processing Code/Libraries
In this tutorial I focused on libigl because it is widely used, has a lot of neat sample code you can easily drop into an Unreal Editor Tool, and it’s header-only. Other header-only C++ libraries should be similarly-easy to use, the main “gotcha” is that Unreal configures the C++ compiler to consider all Warnings as Errors. As a result it may be necessary to disable some warnings to get your code to build. That’s what the file IGLIncludes.h does in the Mesh Processing Plugin, for example. (Of course you could also fix the warnings!)
If you want to use existing cpp files, things get a bit trickier. You have two options. One is to compile those separately into static libraries or DLLs and link to them. To do that you would add them in the MeshProcessingPlugin.Build.cs file. This is not trivial but there is a nice tutorial here (link) explaining how to do it for PCL, the Point Cloud Library. It’s from 2017 so the instructions should still apply (if you google you will likely find many older tutorials that are now out-of-date…).
The second option is to include your code (cpp and headers) directly within the /Private/ and/or /Public/ subdirectories of the Plugin Source folder. Then when you Regenerate Project Files (see step 3 above) your code will be automatically picked up by Unreal Build Tool (UBT) and included in the generated Visual Studio solution, and built into the Plugin’s DLL. This is in fact how many third-party libraries are included in Unreal Engine (there is actually a version of Eigen used in Unreal, it’s just quite out-of-date). Note however that there is not an easy way to exclude cpp files within the /Source/ subdirectory. This can trip up your attempts to just drop a full repository into the Plugin (for example Eigen’s repo includes a lot of cpp test and example code that UBT will try to build and link, unless those files are literally deleted.
Finally, UE4.24 by default configures the compiler to C++14. If your code requires C++17 or higher, it’s not hopeless. You can configure the Build.cs to enable this level of support for your plugin. The first post in this thread explains the lines to add. However that thread also describes some problems you might encounter. Good luck!
UE 4.26 Update
UE 4.26 introduced some changes to the Interactive Tools framework API, and the 4.24 tutorial code will no longer compile. I have ported it to 4.26 and made some updates. I kept the 4.24 version in the Github repo, and put the the 4.26 version in a separate path. If you would like to see the minimal changes necessary, see this commit. After that, I made further updates I will describe below. I also fixed an issue where the Eigen third-party code did not include any files or folders named ‘Core’, due to the .gitignore.
Another UE 4.26 addition is a “Base Tool” class named UBaseMeshProcessingTool. This was inspired by UMeshProcessingTool above, but with some useful additions. In the current 4.26 sample I have ported UMeshProcessingTool to use UBaseMeshProcessingTool. This intermediate might not be necessary anymore, but removing it meant adding quite a bit of boilerplate to the IGL tool, and rewriting some of the tutorial above, so I left it in. From the perspective of the IGL code, not much changed - the diff is here. The main difference is that I used the new PropertySet Watcher API to watch for changes in the properties, rather than a universal event handler.
One other important thing to know is that by default UBaseMeshProcessingTool will scale the input mesh to a unit box before calling any mesh processing code (and inverse-scale the corresponding live-preview and output meshes appropriately). This helps to “normalize” for the vast differences in scale that occur in a game environment, where we can easily have tiny rocks and enormous cliffs in the same scene. You can disable this behavior by overriding UBaseMeshProcessingTool::RequiresScaleNormalization(). Note that because of this normalization, I had to scale the 0-100 range of the Smoothness parameter presented in the UI (a standard complication in Laplacian mesh processing).
Finally two practical notes. First, make sure you install the Starter Content with the Engine, or you will have an empty level when you open the project. Second, UE has a file path limit when building. If you put the sample code in an already-long path, you might find that it won’t build, with errors about being unable to find files. If this is the case try moving the whole folder to a shorter path.